
12 Tips to Optimize Your WordPress RSS Feed (Quick & Easy)
This article will share how to optimize your WordPress RSS feeds.
By default, the WordPress site has RSS feeds that show recent Content. It allows users to get regular updates from a blog or website they like without visiting the site manually.
You can optimize RSS feed to protect your Content from content scraping, get more backlinks to your site, and gain more traffic to your site.
Let us explain how you can Optimize your WordPress RSS Feed.
1. Create an RSS Feed Sitemap
RSS sitemaps include your most recent Content, which helps Google maintain your Content refreshed in search results. It is different from an XML sitemap.
If you publish your content regularly, this can boost your search engine rankings.
All in One SEO plugin easily lets you add an RSS sitemap to your website.
Firstly, Install and Activate the All in One SEO plugin.
You can see our step-by-step tutorial on how to install a WordPress plugin for more detail.
After activation, You need to set up the plugin.
Follow the suggested steps in the setup wizard to set up the All in One SEO plugin.
It will automatically enable RSS sitemaps after the setup, so you need not do anything further.
To check if the site map is enabled or not, go to the All in One SEO » Sitemap and click the ‘RSS Sitemap’ tab.
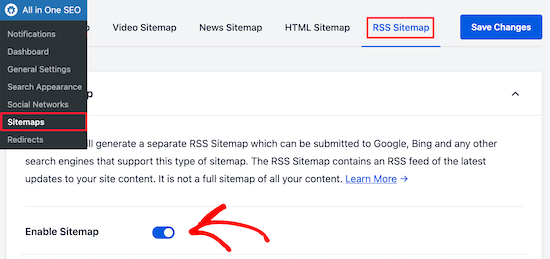
You can notice that the RS sitemap is already enabled.
Further, In the ‘sitemap setting’ box, you can adjust the number of posts and the type of post you want to include in the sitemap.
You can leave the default settings or adjust them according to your need.
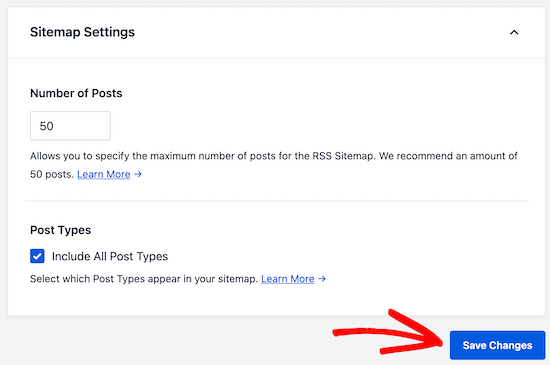
Then, Don’t forget to save the changes.
Now you have enabled the RSS sitemap for your WordPress site.
Further, to submit your RSS sitemap to Google, you can see our tutorial on how you can add your WordPress site to Google Search Console. This process is similar to submitting an XML sitemap to Google.
2. Edit RSS Feed Before and After Content
The WordPress RSS feeds shows your recent post content by default, but you can not customize that content for your RSS feed users.
For customizing your RSS feed before and after Content, you can use the All in One SEO plugin.
You have to follow the steps mentioned above to install, activate, and set up the plugin.
After that, head over to All in One SEO » General Settings and select the ‘RSS Content’ option.
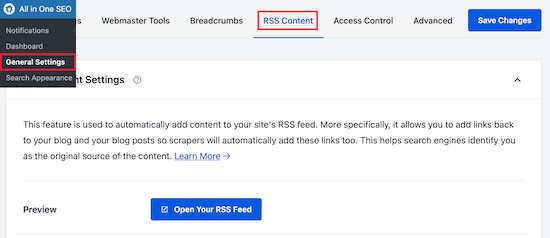
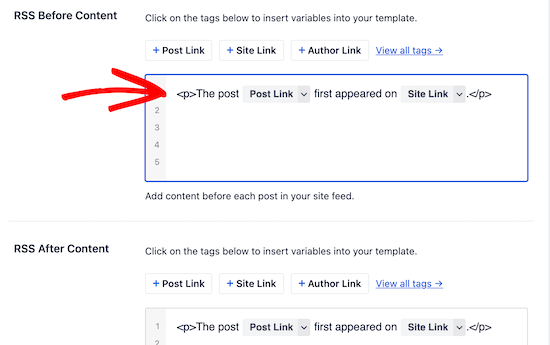
There, you can add the content you want to show before and after each post in your RSS feed.
For example, You can add smart tags for links, HTML, and other metadata to each section.
After setting up the changes, select the ‘Save Changes’ button to save your RSS feed.
3. Protect RSS Feed From Content Scrapers
Content scraping is an unfair way of robbing original content from the website and publishing the robbed content to another website without the permission or knowledge of the content’s owner. They can do it via your RSS feed.
Favorably, you can customize your RSS feed to help your site if somebody takes over your Content through your RSS feeds.
You can see our tutorial on how to prevent content scraping in WordPress for more details.
4. Display Excerpt Instead of Full Article in RSS Feed
Displaying your full article in your RSS feed Allows your users to read the entire article in their feed reader. This can lower your page views, conversion rates, and advertising revenue.
By displaying the article summary rather than the full article in your RSS feed, you tempt and invite readers to come to your WordPress site to read the full post.
For this, WordPress comes with an in-built solution.
From your WordPress dashboard, Navigate to Settings » Reading.
Then, scroll down to the section ‘For each post in a feed, include.’ There you will find two options, full text and Excerpt. Select the ‘Excerpt’ one.
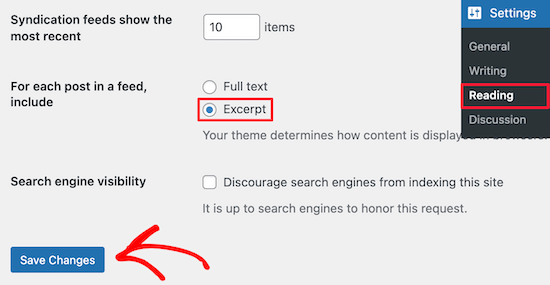
In addition, You can also control the number of posts displayed in your RSS feed.
Enter the number of feeds you want to show in the box into the’ Syndication feeds show the most recent’ option.
Now, click on the ‘Save Changes’ option to update your RSS feed settings.
5. Adding a Featured Image to Posts in RSS Feed
WordPress does not allow you to add featured images to your RSS feed by default. When users read your post in a feed reader, it usually pulls the first picture in your post.
You can change this by adding a code snippet to your WordPress files.
Now, add the code below to your functions.php file or use a code snippets plugin or in a site-specific plugin.
 function wpb_rsstutorial_featuredimage($content) {

global $post;

if(has_post_thumbnail($post->ID)) {

$content = '<p>' . get_the_post_thumbnail($post->ID) .

'</p>' . get_the_content();

}

return $content;

}

add_filter('the_excerpt_rss', 'wpb_rsstutorial_featuredimage');

add_filter('the_content_feed', 'wpb_rsstutorial_featuredimage');
The code will add your featured image inside a paragraph before the post content.
6. Adding Custom Post Types to Your RSS Feed
Many WordPress websites use custom post types to create distinct sections from regular blog articles.
For example, you created separate custom post types for books and Movies.
If you publish much Content using different custom post types, then you may want to add these to your main RSS feed.
For this, you have to add the code in a site-specific plugin or to your functions.php file or use a code snippets plugin.
 function myfeed_request($qv) {

    if (isset($qv['feed']) && !isset($qv['post_type']))

        $qv['post_type'] = array('post', 'books', 'movies');

    return $qv;

}

add_filter('request', 'myfeed_request');
The code will add two custom post types, ‘Movies’ and ‘Books,’ to your main RSS feed.
Note: You have to replace these( books and movies ) with your own custom post types.
7. Adding Additional Text to Post Titles in RSS
You can add additional text to your post titles in the RSS feed if you create different kinds of post content.
For instance, this can help your readers to differentiate between regular blog content, sponsored content, and guest posts.
Use the following code snippet to show the category of post in the title:
 function wpb_rsstutorial_titlecat($content) {

$postcat = "";

foreach((get_the_category()) as $cat) {

$postcat .= ' ('.$cat->cat_name . ')';

}

$content = $content.$postcat;

return $content;

}

add_filter('the_title_rss', 'wpb_rsstutorial_titlecat');
You can see our tutorial on how to completely customize your WordPress RSS feeds for more examples and details.
8. Allow Users to Subscribe to RSS Feed through Email
Most users don’t use a feed reader to subscribe to your posts. Instead, they prefer to subscribe by email. That’s why having an email newsletter is a must.
We suggest using Sendinblue for sending RSS emails automatically. It is a popular email marketing service provider with a forever-free plan to send 300 emails per day.

After setting up your email list, you can send RSS emails automatically whenever you publish a new blog post/article.
You can see our tutorial on how to notify subscribers of new posts in WordPress for more details.
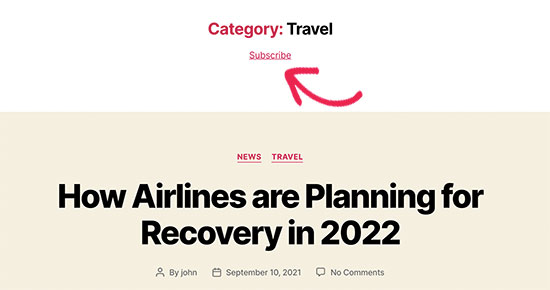
9. Let Users Subscribe to Categories in RSS Feed
Every category on your WordPress site will have its own RSS feed automatically. If you manage a massive blog with various categories, your readers can only subscribe to their interest categories.
Yet, many users don’t know that they can subscribe to specific categories. You can make this easier for your users by highlighting this on your WordPress website.
You can see our tutorial on how to make a separate RSS feed for each category in WordPress for more details.
10. Adding Custom Field Data to Your RSS Feed
The Custom fields allow you to add extra metadata to your WordPress pages and posts. But, this metadata is not included in your default RSS feed.
You can display custom fields in your RSS feed by adding the following code by using a code snippets plugin. You can also add it in a site-specific plugin or to your functions.php file.
 function wpb_rsstutorial_customfield($content) {

global $wp_query;

$postid = $wp_query->post->ID;

$custom_metadata = get_post_meta($postid, 'my_custom_field', true);

if(is_feed()) {

if($custom_metadata !== '') {

// Display custom field data below content

$content = $content."<br /><br /><div>".$custom_metadata."</div>

";

}

else {

$content = $content;

}

}

return $content;

}

add_filter('the_excerpt_rss', 'wpb_rsstutorial_customfield');

add_filter('the_content', 'wpb_rsstutorial_customfield');
The code will add the custom field data below the post content.
11. Delay Posts From Appearing in RSS Feed
You can Delay posts from appearing in your RSS feed. It can help you beat content scrapers if you face it regularly, and it can save you from accidental publishing.
Once you delay posts from appearing in your RSS feed, you give them time to search engines to crawl and index your Content before it occurs elsewhere.
And you can also check for any typographical mistake before it gets out to RSS subscribers.
For this, you have to add the code to your functions.php file or use a code snippets plugin or in a site-specific plugin.
 function publish_later_on_feed($where) {


    global $wpdb;


    if ( is_feed() ) {

        // timestamp in WP-format

        $now = gmdate('Y-m-d H:i:s');


        // value for wait; + device

        $wait = '10'; // integer


        // http://dev.mysql.com/doc/refman/5.0/en/date-and-time-functions.html#function_timestampdiff

        $device = 'MINUTE'; //MINUTE, HOUR, DAY, WEEK, MONTH, YEAR


        // add SQL-sytax to default $where

        $where .= " AND TIMESTAMPDIFF($device, $wpdb->posts.post_date_gmt, '$now') > $wait ";

    }

    return $where;

}


add_filter('posts_where', 'publish_later_on_feed');
The code will delay the post 10 minutes before it appears in your RSS feed. You can adjust it according to you by changing the ten(10) and minute values.
12. Adding Social Buttons to Your WordPress RSS Feeds
Most of the RSS feed readers don’t have social sharing buttons, or they are not observable. But, you can add any social media icons to your RSS feed.
You have to create image icons for the social media networks you want to add to your RSS feed.
For now, we created images for Twitter and Facebook. To upload them visit Media » Add New.
After that, you have to copy the ‘Image URL’ and paste it into your text editor to save it for the next step.
[Note: You can find your image URL by first clicking the ‘Media’ option from your WordPress dashboard then choosing the image you want to add. Then from your right menu, you will see the image URL at the end.]
![]()
Now, you have to add the following code to your functions.php file or use a code snippets plugin or in a site-specific plugin.
// add custom feed content function wpb_add_feed_content($content) { // Check if a feed is requested if(is_feed()) { // Encoding post link for sharing $permalink_encoded = urlencode(get_permalink()); // Getting post title for the tweet $post_title = get_the_title(); //Content you want to display below each post // This is where we will add our icons $content .= '<p> <a href="http://www.facebook.com/sharer/sharer.php?u=' . $permalink_encoded . '" title="Share on Facebook"><img src="Facebook icon file url goes here" title="Share on Facebook" alt="Share on Facebook" width="64px" height="64px" /></a> <a href="http://www.twitter.com/share?&text='. $post_title . '&url=' . $permalink_encoded . '" title="Share on Twitter"><img src="Facebook icon file url goes here" title="Share on Twitter" alt="Share on Twitter" width="64px" height="64px" /></a> </p>'; } return $content; } add_filter('the_excerpt_rss', 'wpb_add_feed_content'); add_filter('the_content', 'wpb_add_feed_content');
This code will add the social sharing icons for Twitter and Facebook.
You have to replace the src= attribute in the image tag with your own image URLs that you pasted into your text editor in the earlier step.
We hope this tutorial helped you to know how to optimize your WordPress RSS feed.