How to Add a Custom Login URL in WordPress
Would you like to add a custom login URL in WordPress?
By adding a custom login URL in WordPress, you can improve your WordPress site security and offer your users a better experience.
WordPress does not have an option to customize the login URL, but you can add it easily using a plugin.
In this write-up, we’ll explain how to add a custom login URL in WordPress.
Why Adding a Custom Login URL in WordPress?
WordPress powers over 40% of all websites. Because of its popularity, it frequently became a target of hackers who try to log in to your dashboard using techniques like brute force attacks.
Hackers and bots are aware of the common WordPress login URLs like wp-admin and wp-login, and they use these URLs while trying to log in to your WordPress site.
You must change your login URL as it improves your site’s protection while making it difficult for hackers to log into your WordPress website.
Moreover, by adding a custom login URL in WordPress, you can offer a better user experience. Like, you can customize the URL and your login page design to match it with your brand and your WordPress theme.
By default, WordPress doesn’t have the option to customize the Login URL; therefore, you have to do it manually.
Now, moving ahead on the method to add a custom login URL in WordPress.
Changing WordPress Login Page URL with a Free Plugin
The simplest method to change the login page URL is by using a WordPress plugin. This allows changing your WordPress login URL without editing any core WordPress files.
You can use the WPS Hide Login plugin to add a custom URL in WordPress. It is free to use and lets you add the custom URL easily.
To start, you have to install and activate the plugin. You can see our tutorial on how to install a plugin to your WordPress site.
After activation, this plugin will add up a WPS Hide Login option under your settings menu.
Now, visit the Settings » WPS Hide Login.
Then, enter your new login page URL into the ‘Login URL box.
In addition, You can also add up a redirect URL in the’ Redirection URL box.
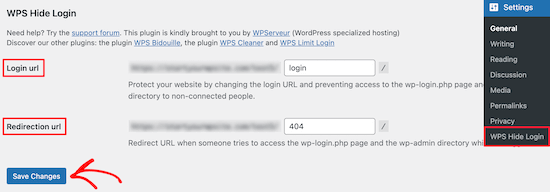
This redirect URL will redirect people to another page on your WordPress blog when they try to log in to your default wp-login.php page, and they will not be able to log in.
After adding the URLs, click on the ‘Save Changes’ tab to save your changes.
Now, your visitors will automatically be sent to your new login page URL.
Adding a Custom Login URL Using SeedProd
You can also use the SeedProd plugin, the best drag and drop WordPress page builder plugin. It lets you customize your login page and change the URL easily.
To start, you have to install and activate the plugin. You can see our tutorial on how to install a plugin to your WordPress site.
Note: The plugin comes with the free version of SeedProd, but we will use the premium version for this article as it has the login page templates we need later.
After activation, you have to visit SeedProd » Settings and enter your license key.

You will get your license key under your account details on the SeedProd website.
Then, go to the SeedProd » Pages and click on the ‘Set up a Login Page’ tab.
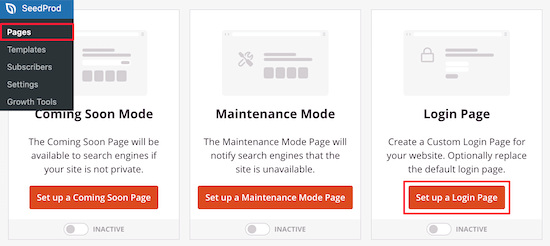
Then on the next screen, you will notice all of the login page templates.
You can select one of the pre-made templates or select the ‘Blank’ template to create a login page from scratch.

We are using the ‘Geo Login Page’ template for this article.
Head over to the template you like to use and click on the check icon.

After that, a popup appears where you can enter a name for your new login page and add a custom login page URL and click the ‘Save and Start Editing the Page’ tab.
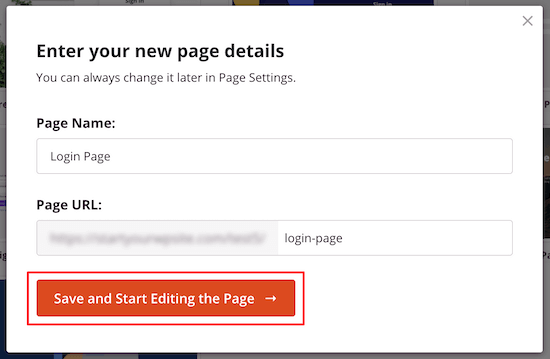
On the next page editor screen, You can fully customize the page with the drag and drop builder.
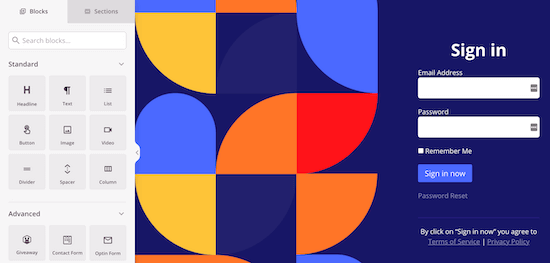
You can add blocks and sections to the page from the left, and the right side will display a real-time preview of what it looks like.
Selecting any page element will bring up a menu to customize your page more, or you can leave the default settings.
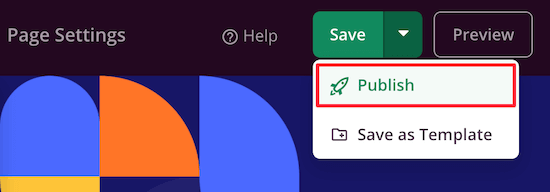
After that, click on the arrow next to the ‘Save’ box and click on ‘Publish’ from the drop-down menu.
Now, change the default login URL to your new login page.
Click the ‘Page Settings’ option at the top of the page and scroll down the page until you see the ‘Redirect the Default Login Page’ option.
Then, simply click the ‘Enable’ toggle.

This will redirect the default WordPress login page to the new page you just created.
Now, click the ‘Save’ tab again to save your changes.
We hope this article helped you to add a custom login URL in WordPress.
