How to Create a Paid Newsletter in WordPress (Substack Alternative)
Need to create a paid newsletter in WordPress without using Substack?
Paid newsletters are a smart way to make online money from your email subscribers. However, using a platform like Substack can be very costly.
This tutorial will step-by-steply share how to create a paid newsletter in WordPress.
Why Create a Paid Newsletter in WordPress?
Paid email newsletters like Substack are getting very popular and successful in making money online. They are like regular email newsletters, with exclusive premium content only for paying subscribers.
A paid newsletter can be a standalone online business or another income source for your WordPress website.
By making your own paid email newsletter, you can directly earn profit from your writing while raising a connection with your readers.
However, using a platform like a substack can be a big budget.
Substack also takes 10% of all your earnings, so you end up paying more and more over time.
Creating a paid newsletter on your WordPress website can help you to avoid paying high fees and hold on to more of your earnings for yourself.
The benefit of using WordPress is that it is fully customizable and scalable, so you can only put money into the features you need.
Plus, it gives you more control over your newsletter design, subscriber experience, and much more.
Let’s move ahead to create a paid newsletter in WordPress.
Step 1: Sign Up for an Email Service Provider
First, you have to start your paid email newsletter is an email marketing service provider to gather email addresses and send emails to your subscribers.
For creating a paid email newsletter, we suggest using ConvertKit. It’s an email marketing platform for authors, bloggers, and marketers. It is easy to use and has all the features you’ll require to create a paid email newsletter.
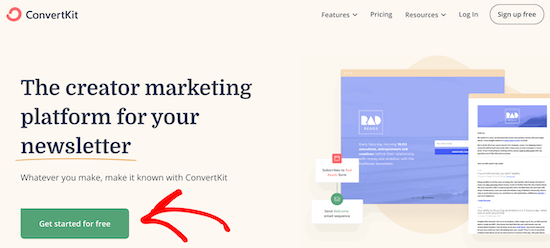
First, you have to visit the ConvertKit website and click on the ‘Get started for free’ tab to sign up for a plan.
Enter your business details and then provide an email address and password. Then click the ‘Get Started’ tab.

Keep this screen on because you will need your account details later below.
Note: This tutorial will work with other email marketing platforms as well, such as Constant Contact, Drip, MailChimp, etc. But we are taking ConvertKit as our example.
Step 2: Add up Membership Functionality to Your Email Newsletter
Once signing up for an email marketing service, next, you have to choose a way to process payments and add up premium membership functionality to your email newsletter.
The ConvertKit has an in-built way to create a premium newsletter and accept payments, which is only available on the Creator Pro plan that costs much more than the regular plan.
That’s why we suggest using a separate WordPress membership plugin since it removes the extra transaction fees and provides you the flexibility to sell other digital goods like eBooks, courses, and more.
To set up memberships in WordPress, we suggest using MemberPress. It’s the finest WordPress membership plugin that allows you to sell newsletter subscriptions on your site.

To start, install and activate the MemberPress plugin.
You can see our step-by-step tutorial on how to install a WordPress plugin for more details.
After activation, visit the MemberPress » Settings and click the ‘License’ menu to enter your license key.
You can find this license key under your MemberPress account.

After placing your license key, click on the ‘Activate License Key’ tab.
Now, set up a method to receive payments.
MemberPress provides several popular payment gateways such as Authorize.net, PayPal, Stripe, and more.
To add a payment method, visit MemberPress » Settings, click the ‘Payments’ button and then click the ‘Plus’ tab.

Now, enter a name for the payment method, and then select your payment gateway from the drop-down.
It will ask you to enter the details of that payment method.
For instance, for PayPal payments, you have to enter your PayPal email.
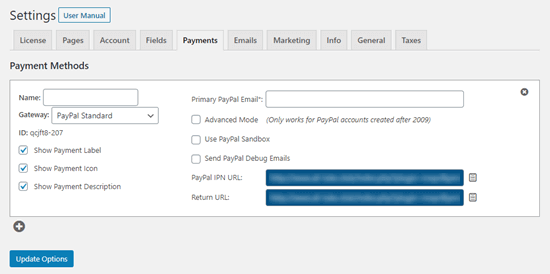
If you want, You can add multiple payment methods for your subscribers.
For that, click on the ‘Plus’ icon and follow the similar process as above.
After adding the payment options, click the ‘Update Options’ tab to save your changes.
Step 3: Create a Paid Email Subscription Plan and Sign Up Page
After setting up the plugin, you must create a paid subscription plan for your subscribers. For this, you have to create a membership level in MemberPress.
Head over to MemberPress » Memberships and click on the ‘Add New’ tab.

On the next screen, you have to give a name to your membership plan and set up the price into the ‘Membership Terms’ meta box.
After creating a membership level, a sign-up page will be automatically created. So, the name you used for this page will show up when your users are about to sign up.
We have named the plan ‘Premium Subscription’ and set up the price to $5 per month for this article.
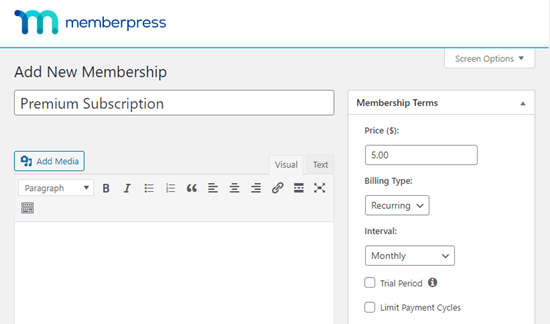
The MemberPress plugin gives you complete control over the membership details. You can adjust the price, payment terms, duration, and more.
Generally, most premium email newsletters charge monthly, but you can choose to use ‘Recurring’ or ‘One-time’ billing. You can select weekly, monthly, quarterly, annually, or custom intervals for reoccurring payments.
Moreover, You can set a free trial period so that your subscribers can test your newsletter before they choose to buy.
You can customize your membership plan even more, using the provided options in the ‘Membership Options’ box under the post editor.
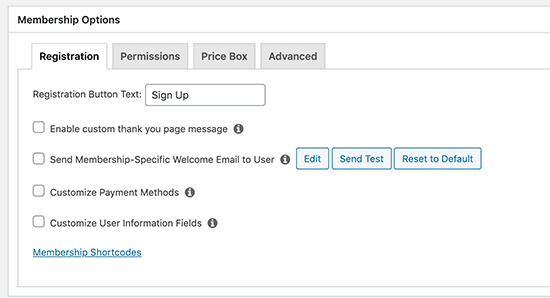
Although the default settings perform well for most cases, if you want, you can still review them to adjust according to you.
We suggest looking over the ‘Enable custom thank you page message’ option.
Then, choose the ‘Enable custom thank you message’ radio tab.
After that, you will find a drop-down where you can type a custom thank you message for your users. You can also redirect subscribers to a custom thank you page.

Now, click on the ‘Publish’ tab to save your membership plan.
Some users may want to create a completely customized registration page for their email subscribers. This helps you create an attractive design that will convert more visitors into customers and subscribers.
For creating a custom sign-up page, you can use a SeedProd, drag and drop page builder. It is easy to use and is available in the free version also.
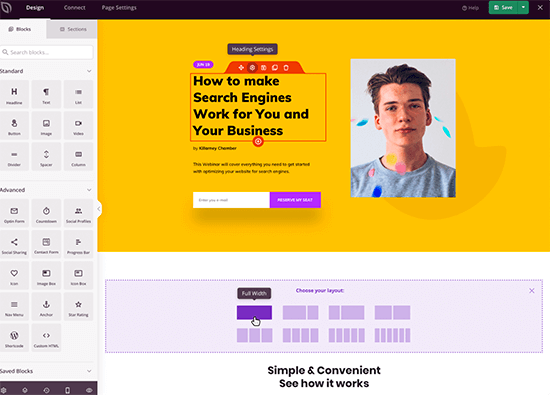
You can see our tutorial on how to create a landing page with WordPress for more details.
To add your registration form to a SeedProd landing page, you must use the shortcode to display your sign-up form.
[mepr-membership-registration-form id="6492"]
You have to replace the ID with your membership page ID. You can find it in the URL for your page.

Another option you must consider is making your sign-up page the homepage of your WordPress site. This is great if your website’s purpose is only to get sign-ups for your paid newsletter.
For this, visit Settings » Reading. Then, click the ‘A static page’ radio tab.

Then, select your page from the ‘Homepage’ drop-down menu.
After that, click the ‘Save Changes’ tab at the bottom of the page.
Now, your visitors will notice your premium newsletter sign-up form right at the moment they land on your site.

Step 4: Connect ConvertKit with MemberPress in WordPress
After creating a membership plan and registration page, you now have to connect ConvertKit to MemberPress so that your new members or users will be automatically added to your email list.
For that, you will need the ConvertKit addon. You can download it from your MemberPress website account by logging into your account and clicking the ‘Download’ button.

Now, scroll down to find ‘ConvertKit’ and click it to download the addon.

Then, you have to install and activate the addon in the same way you installed the MemberPress plugin.
After that, visit MemberPress » Settings and click the ‘Marketing’ button, and then check the box next to ‘Enable ConvertKit.’

Then, you have to place your API key in the drop-down menu. You will find it inside your account settings on your ConvertKit website.
In addition, you can also select a tag from the ‘ConvertKit Tag’ drop-down menu. This will automatically tag new subscribers who will sign up for your premium newsletter.
After that, click the ‘Update Options’ tab.
Now your users can sign up for your premium email newsletter.
When they sign up and complete their subscription, they will be automatically added to your list in ConvertKit, where you can forward your premium newsletter.
Profitable Premium Newsletter in WordPress
The benefit of using WordPress and MemberPress to make your premium newsletter is that you do not depend on a single email marketing platform.
In this tutorial, we suggested ConvertKit since it has great automation features and has good email deliverability.
However, this tutorial will work with other email marketing platform that integrates with MemberPress, such as Constant Contact, Drip, MailChimp, AWeber, GetResponse, Active Campaign, Keap, and more.
This method gives you complete flexibility to relish the freedom of WordPress without locking into a single email marketing platform.
We hope this Write-up helped you to create a paid newsletter in WordPress.
