How to Find and Access WordPress Error Logs
While working on a WordPress website, you might encounter common WordPress errors. This write-up will share How to Find and Access WordPress Error Logs.
WordPress comes with an inbuilt debugging system that can log on to any error message shown on your site. This system will help you to find and access your WordPress error logs. However, this system is turned off by default.
What are WordPress error logs?
The WordPress error log is the list of error notifications developed by your website with dates and times they occurred. When WordPress debug mode is turned on, these notifications are collected in a file so that you can check them afterward.
Why enable WordPress error logs?
The error log function in WordPress is disabled by default. This means you will not get any error notifications or warnings signals your website is experiencing.
The error log is the troubleshooting tool that helps you track and save the errors in the file. They will help find the exact cause of the problem and develop solutions to fix them.
Enable WordPress Debug Mode using a Plugin
By default, WordPress debugging mode is off, so it will not be logging any errors. If you want to turn on debug mode, you can use a plugin by logging in to the admin area.
WP Debugging Plugin

You have to install the WP Debugging plugin.
Go to Plugin >> Add new >> Search WP Debugging >> Install >> Activate.
After this, the plugin automatically activates WordPress debug mode, and the error messages will be tracked and saved in a file.
Enable WordPress Debug Mode Using a Code
Suppose you like the coding method. You can turn on WordPress debug mode using a code.
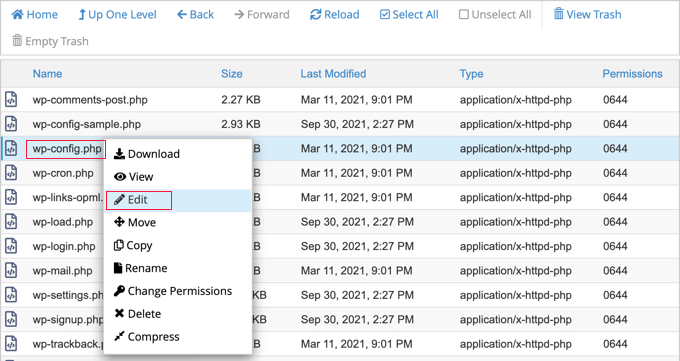
Here you have to edit your wp-config.php file using the file manager option in your WordPress control panel or an FTP client.

After the file opens, find the text ‘That’s all, stop editing! Happy blogging.’
Before this line, place the given code.
 define( 'WP_DEBUG', true );

define( 'WP_DEBUG_LOG', true );
After this, you have enabled the debug mode.
Where to Find and Access the WordPress Error Logs?
Once you enable the debug mode, The error log file will store any future error messages on your website.
Now, you have to go to your file manager option in your WordPress control panel or connect it to your website using an FTP client.
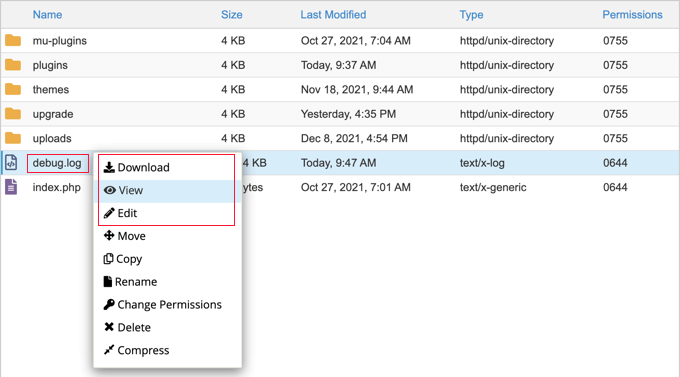
Here, navigate to the /wp-content/ folder. Inside this, you will find a file named debug.log.
the /wp-content/ folder >> debug.log

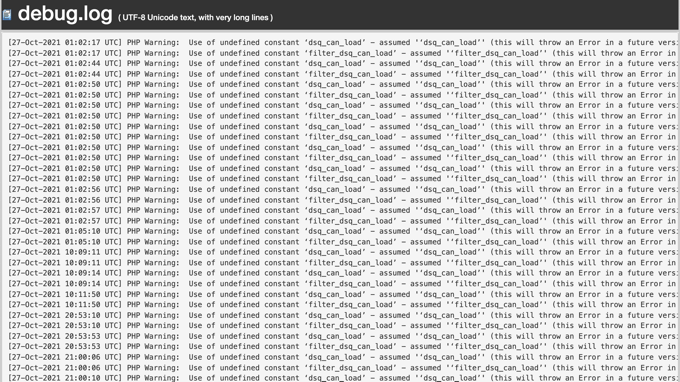
This file contains all the error notifications and messages with the date and time they occurred.
To see the content, you can download, view or edit it. This file will help you get the exact cause of the error to fix it.

Disable WordPress Debug Mode
After you fix the error on your website, we suggest you disable the debug mode. Because if you leave debug mode on, it may slow down your website or leak information that can risk your website.
If you used the plugin method to turn on debug mode, then
Go to plugins >> Installed plugins >> Deactivate the WP Debugging plugin.

If you used the coding method to turn on debug mode, then edit the wp-config file.
You have to change the WP_DEBUG and WP_DEBUG_LOG lines to ‘false.’

To Conclude-
The WordPress error logs or debug mode is a great tool to examine your site when it is not working properly. It will help find and access the source of the errors to fix them.
You can turn on debug mode using a wp debugging plugin or coding method. Once you fix the issue on your website, we suggest turning off the debug mode.
