How To Unblock Limit Login Attempts in WordPress
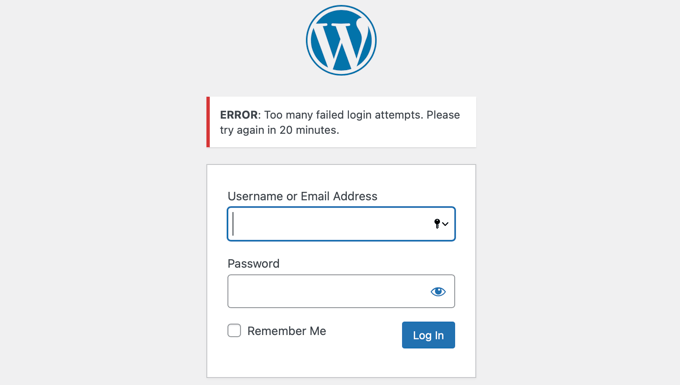
Did you lock yourself out of your website because of exceeding failed login attempts?
If you enter the wrong password too many times, then your site’s protection actions may block you from your WordPress dashboard.
In this article, we’ll share how to unblock the Limit Login Attempts in WordPress.
Why are you Blocked Out of Your Own WordPress Site?
WordPress lets users enter the password as many times as they want, but you may have limited login attempts by using a WordPress plugin for your website for security reasons.
If you entered your password incorrectly or forgot that you have changed your password and tried to log in entering the wrong password too many times, then you may lock yourself out of your own WordPress admin area.
Then, to access your WordPress site, you have to unblock limited login attempts in your WordPress temporarily.
You can unblock limit login attempts in two ways:
1: Unblock using FTP
2: Unblock using MySQL
Method 1: Unblock Limit Login Attempts Using FTP
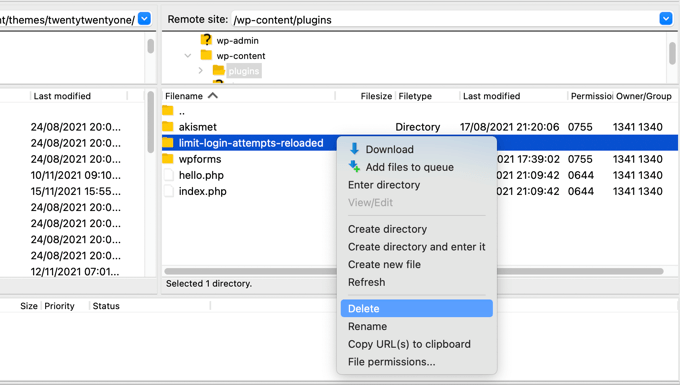
The simplest method to unblock yourself is to delete the Limit Login Attempts Reloaded folder and then install the plugin again once you gain access to your site.
To start, you have to use an FTP client or the file manager option in your WordPress hosting control panel.
You have to connect to your site using your file manager or FTP client and then visit the /wp-content/plugins/ folder.
After that, you have to delete the limit-login-attempts-reloaded plugin folder from there.
Now, you can access your WordPress admin area easily.
After that, you can reinstall and activate the Limit Login Attempts Reloaded plugin whenever you want. You can see our tutorial on how to install a WordPress plugin for more details.
Method 2: Unblock Limit Login Attempts Using MySQL
The first method is simple and easy to use. However, you may want to see the other method as well. This method uses phpMyAdmin and MySQL.
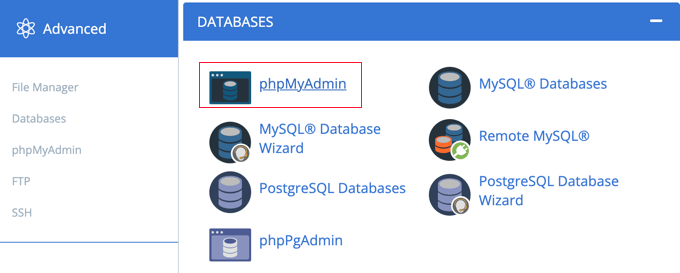
To start with this method, you have to log in to your web hosting dashboard and scroll down to the Databases section. Then, click the ‘phpMyAdmin’ icon from the Databases section.
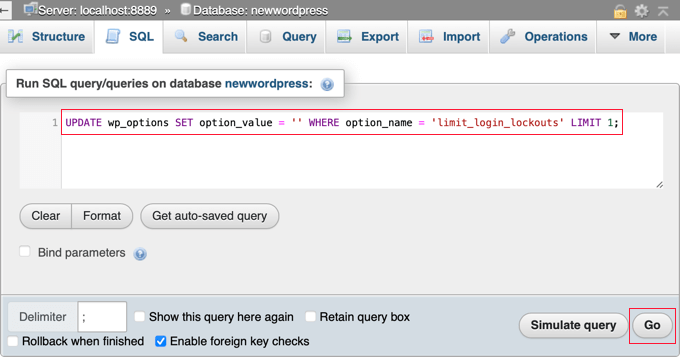
Now, it will launch phpMyAdmin in a new browser window. You have to select your WordPress database if it is not selected. Then, you click on the ‘SQL’ menu. Now, copy the following query and paste it there:
UPDATE wp_options SET option_value = '' WHERE option_name = 'limit_login_lockouts' LIMIT 1;
The query will assume you are using the default ‘wp_’ database prefix. If you have changed your database prefix, then you will have to change it in the query with the correct prefix.
Then, click the ‘Go’ tab at the bottom of the screen to run the query. You’ll see a confirming message saying the query was successful.

This resets the number of unsuccessful retries, and you can now access your WordPress admin area.
If you prefer to unblock your own specific IP address instead of everyone’s, then run the following query instead of the above one:
UPDATE wp_options SET option_value = REPLACE(option_value, '111.222.111.222', '') WHERE option_name = 'limit_login_lockouts' LIMIT 1;
Note: Please change the IP address in the query with your actual IP address in place of ‘111.222.111.222’.
To find your IP address visit the site WhatIsMyIP.com in your web browser. You get your IP address from there.
To conclude- If you have locked yourself out of your website because of exceeding failed login attempts, you can unblock yourself by using FTP or MySQL.
We hope this write-up helped you learn How To Unblock Limit Login Attempts in WordPress.