How to Add a Custom Domain Alias to WordPress Landing Page
Follow the steps to add a Custom Domain Alias to WordPress Landing Page.
Instead of installing a separate WordPress website, it will be great to use your existing WordPress site to make landing pages and point different domains to specific custom landing pages.
Why should you add a Custom Domain to a WordPress Landing Page?
Adding a Custom Domain for a WordPress landing page will help you save your time and money to create a separate website. We will explain this with different examples given below.
Suppose you have a blog of cooking recipes on a domain name mycookingrecipes.com. Now you are willing to sell online courses on your site.
The easy way to publicize your online business would be to have its marketing website using a different domain name (e.g., awesome cookingcourse.com).
For that, you can create a separate WordPress site and spend your time and money, or you can add a custom domain and direct it to a landing page on your existing WordPress website.
This is the simplest way to make an awesome landing page that is highly optimized for conversions. Simultaneously, you can use the same WordPress installation for making and selling courses.
Likewise, if you own a WooCommerce store and bring out a new product on your store, you are willing to use a custom domain to publicize that product without making a different WooCommerce store.
This helps you save your time on website maintenance tasks while keeping your WordPress website valuation under control.
Now, moving on the way to add a custom domain alias to your WordPress landing page.
Creating Your Landing Page in WordPress
To start, let’s create the landing page on your existing WordPress site.
SeedProd is the finest WordPress landing page plugin that allows you to make any type of landing page without any coding. It is easy to use, speed optimized, and SEO-friendly.
To start, You have to install and activate the plugin. You can see our step-by-step tutorial on how to install a WordPress plugin for more details.
The plugin comes with free and pro versions. The free version of the SeedProd plugin is available on WordPress.org, but we are using the Pro version here, which offers more additional features.
Setting up the plugin
After activation, visit SeedProd » Settings page to enter your license key. You will get your license key under your account.

Next, visit SeedProd » Pages and click the ‘Add New Landing Page’ tab.

Then, you have to select a landing page theme.

SeedProd comes with many attractive landing page templates for different campaign types. Click to choose a template you want to use.
After that, you have to enter your page details. You have to enter a title for your page and a URL.

After entering the required details, click on the ‘Save and Start Editing the Page’ tab to continue.
Now, it will load the SeedProd page builder interface and show a live preview of your page to the right of a toolbar.

The page builder is easy to use. You can click any item on the page to edit it and change it. Also, you can add new elements by adding blocks from the left menu.
It comes with all commonly used blocks required to make any landing page. You can also add up complete sections by visiting the sections menu.

The sections include header, footer, call to action hero image, and more.
You can change the element on your landing page by changing its properties like colors, background images, fonts, size, and more.

In addition, You can connect your landing page to third-party tools by heading over to the ‘Connect’ button.
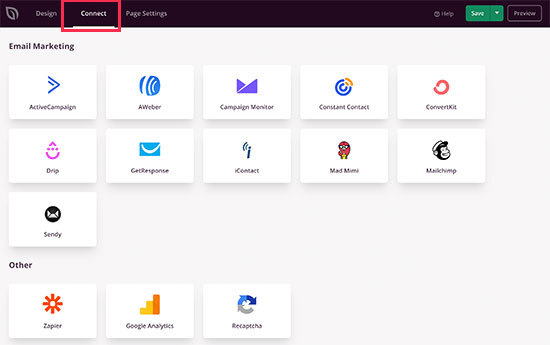
SeedProd supports top email marketing platforms, Google Analytics, and other apps via Zapier.
Once you are happy with your landing page, click on the Save tab to publish your landing page.

Add Custom Domain to Your Landing Page
After creating a landing page, you must tell SeedProd that this landing page will be shown by using a custom domain alias.
For that, you have to edit the page and visit the ‘Settings’ menu. Now, you will notice the ‘Custom Domain’ option where you have to turn ON the toggle next to a custom domain.

Next, you have to enter the domain name you want to use.
If your custom domain name has enabled an SSL certificate for it, then you have to turn on the ‘force HTTPs’ option as well.
After that, click the Save tab to store your changes.
If you visit your landing page right after this, it will display an error. Since SeedProd is trying to utilize your custom domain name, the domain name does not point to your website until now.
You have to change that to point your domain name to your website.
Setting up Custom Domain Alias
You have to point your custom domain alias to your WordPress hosting provider.
For that, edit the DNS nameservers under your domain registrar account.
A nameserver is part of the domain name system’s global database, which tells other computers where to find domain names.
You can see which nameservers to use for your hosting company by asking their support team. For example, Hostkicker uses the following nameservers for most websites:
ns1.hostkicker.com
ns2.hostkicker.com
Once you get the nameservers used by your hosting provider, you have to note them as you will need them later.
For now, we will be showing you a domain registered at Domain.com by pointing it to Hostkicker. Although, the basic instructions are similar for most domain registrars.
First, you have to log in to your Domain.com account. Then, click the ‘DNS & Nameservers’ link in the left sidebar.

Before you start, make sure the domain selected at the top of the screen is correct. After that, scroll down to the NS records section.
Now, click on the three vertical dots next to ns1.domain.com and select Edit.

You will notice a popup where you have to edit the nameserver record. To do that, type the new nameserver in the ‘Content’ box and click on the ‘Update DNS’ tab.

Repeat the similar process for the ns2.domain.com nameserver record as well. Now, You will notice your updated nameservers in the list.

Adding Custom Domain to Your Hosting Account
Now, as your custom domain is pointing to your WordPress hosting provider, You have to add it to your hosting account.
Here, We’ll illustrate how to add your domain name to Hostkicker. But, the process is similar for most hosting providers.
First, log in to your hosting account dashboard and visit the Domains » Assign page. Now, you have to enter the domain name under the ‘Use a domain that is not already associated with your account’ option.

Hostkicker will now check if the domain name points to their nameservers or not. After that, scroll down to the ‘Addon vs. Parked’ section and select the ‘Addon’ option.

Under that, you will find the option to select the directory (folder) that you want to use for this domain. You have to select the directory where your WordPress website is installed.

If you are not sure, you can choose the public_html option below.
Lastly, click on the ‘Assign this domain’ tab to add your domain name.
It’s done, Now, you can enter your custom domain alias in a new browser option, and it will show your WordPress landing page automatically.

We hope this write-up helped you add a custom domain alias to a WordPress landing page.