How to Fix the 403 Forbidden Error in WordPress
Is your WordPress site displaying the 403 Forbidden error? It is one of the most terrible errors that a WordPress user may encounter. Here, we’ll discuss how to easily fix the 403 forbidden error in WordPress.
What is a 403 Forbidden Error in WordPress?
WordPress displays messages and codes when an error arises on your website.
The 403 Forbidden error code appears when your server permissions do not allow access to a specific page. The error is usually shown by the text:
‘403 Forbidden – You don’t have permission to access ‘/’ on this server.’

Besides that, a 403 Forbidden error may occur while trying to use an ErrorDocument.
There are different situations when you can notice this error, such as:
- 403 Forbidden – Access denied on WordPress login page or wp-admin
- Forbidden 403 – During WordPress installation
- 403 Forbidden when visiting any page on your WordPress website.
- Instead of full 403 Forbidden, you may notice only ‘Access Denied’ or ‘Access to yourdomain.com was denied. You do not have the authorization to view this page.’
After knowing the different types of 403 errors, move on to the cause of this error.
What Causes 403 Forbidden Error in WordPress?
The most familiar cause for the 403 Forbidden error in WordPress is the poorly configured security plugins. Most of the WordPress security plugins can block IP addresses if they consider them to be destructive.
The other cause may be a corrupt .htaccess file or faulty file permissions on your server.
Sometimes your WordPress hosting company makes accidental changes to their server settings which leads to 403 Forbidden errors on your website.
Now, moving on to the method to resolve 403 forbidden errors in WordPress.
How to fix 403 Forbidden Error in WordPress
Before doing anything, we suggest creating a complete backup of your website by visiting your hosting C-panel dashboard.
Fixing the 403 Forbidden Error Caused by a Plugin
To check if the plugins are creating the error, you have to deactivate all WordPress plugins temporarily.
After deactivating the plugins, if the error disappears, this suggests one of the plugins on your site was creating this error.
You can find the faulty plugin by activating all your plugins one by one until the 403 forbidden error reappears, and you will get the faulty plugin. Then delete the plugin causing the error. If this does not work for you, move on to the next method to resolve the issue.
Fixing the 403 Forbidden Error Caused by Corrupt .htaccess File
The 403 error may appear due to a corrupt .htaccess file in your WordPress site. You can repair this file easily.
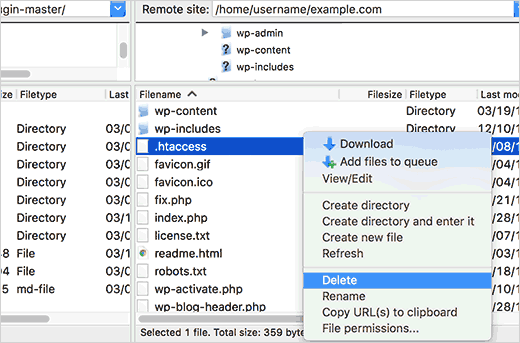
For that, first, you have to connect your website using an FTP client or file manager and then find the .htaccess file in your WordPress root folder.
Now download a fresh backup of the .htaccess file to your computer. Then, delete the file from your server and try to access your website.

If this fixes the 403 forbidden error, then your .htaccess file was corrupt.
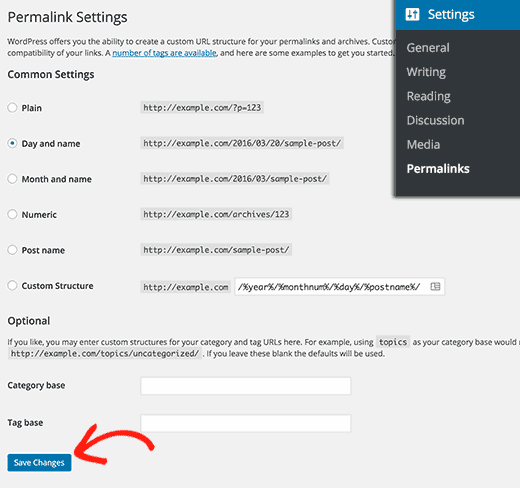
After that, create a fresh .htaccess file by visiting your WordPress admin area and then the Settings » Permalinks page.

Now, click the Save Changes tab at the bottom of the page, and WordPress will create a fresh .htaccess file.
Fixing the 403 Forbidden Error Caused by File Permissions in WordPress
When the above two methods could not resolve the 403 forbidden error on your site, then the incorrect file permissions may be the most probable cause of the issue.
All files stored on your WordPress website have file permissions. These permissions control who can access the files and folders on your website.
The incorrect file permissions can create a 403 forbidden error. As a result, your web server assumes that you don’t have permission to access those files.
To resolve this error, you can ask help from your WordPress hosting provider to check out your website for correct file permissions and fix the error.
Changing the file permissions yourself can be very tricky. If you are unsure about it, then you can also take professional help.
But, if you like to do it yourself, you can check your file permissions by the following method.
Firstly, You have to connect to your WordPress site using an FTP client or file manager. Then visit the root folder, which contains all your WordPress files.

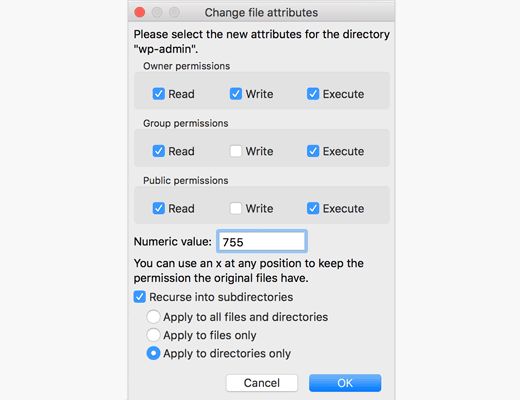
Now, Click to select a folder, right-click on it and select File Permissions from the menu.
After that, Your FTP client will display a file permissions dialog box similar to this:

Now, all folders on your site must have a file permission of 744 or 755 and
all files on your site must have a file permission of 644 or 640.
You can adjust the file permission for the root folder to 744 or 755. Check the box beside the ‘Recurse into subdirectories’ and then choose the option that says ‘apply to directories only.’
After that, click on the OK tab. Now, your FTP client will start setting permissions to all subdirectories in that folder.
Once it is completed, you have to repeat the process again for all the files. This time you have to set the file permission of 644 or 640 and then select ‘Recurse into subdirectories’ and ‘apply to files only’ Options.
After that, again click on the OK tab, and your FTP client will start setting file permissions for all the selected files.
After the adjustments, try to access your website, and the 403 forbidden error should be disappeared now.
To conclude- If you see the 403 Forbidden Error in WordPress, you can try using our solutions to fix the issue. We hope this helped you fix the 403 forbidden error in WordPress.
If you are experiencing any other error on your site, you can fix it by following the steps told in our other article on what to do when you are logged out of the WordPress admin area.
