
How To Protect Admin folder in WordPress
If you own a website, the first thing you should focus on is security. It is because there are hackers in this digital world who are constantly trying to get in and harm you. Admin folder in WordPress is the key to accessing your entire website. There are many ways to protect your admin folder in WordPress by limiting access in .htaccess.
The .htaccess is a powerful file that helps you in security matters and has the configurations to improve the site’s performance. You can limit access to your wp-admin login page, assigning some specific IPs in your .htaccess File.
This article tells many ways you can protect your folder You can use plugins or by configuring the .htaccess File manually
Protect Your Admin Folder In WordPress By Limiting Access in .htaccess (By Plugins).
1. WP Security Scan
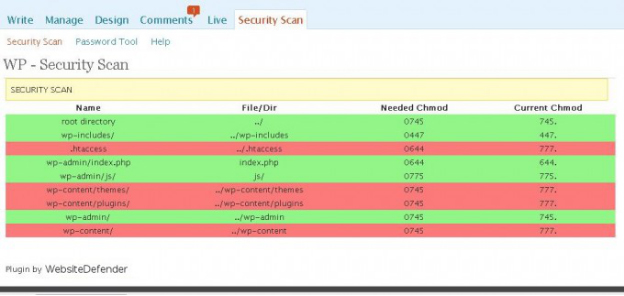
Using the WP Security Scan plugin, you can protect your admin folder in WordPress by limiting access to the .htaccess File.
On the left of the Dashboard, go to the Plugins option and click on Add New. Search WP Security Scan plugin and install.
- Plugins >> Add New >> Search WP Scan >>Install
You can also check our stepwise guide on how to Install WordPress plugin for more help.
Now, go to settings and find .htaccess in the file scan report.
Set the permission settings to protect your admin folder. It is the only plugin in the market that helps you change settings in the .htaccess File.
Other than this, there are other popular security plugins such as All In One WP Security & Firewall as Wordfence Security.
Protect Your Admin Folder In WordPress By Limiting Access in .htaccess (Manually)
The plugins are good to use if you want an easy way, but the plugins may have limited settings. However, You can protect your admin folder manually in many different ways.
Therefore, you can take things into your hand and configure the .htaccess File yourself. Likewise, there are a lot of security measures you can take by inserting code snippets.
How to Access the.htaccess File
You need FTP software to access the files and folders of your website. FileZilla is the best FTP software. Install FTP software and open it. Then log into your cPanel account.
[Note – There may be different.htaccess File in the root directory or a different folder. You do not need to edit those files. You have to edit the .htaccess File inside the WP-Admin folder only.]
Accordingly, move inside the WP-Admin folder and find the .htaccess File. If you do not have any file, you must create it with .htaccess. Before this, you must take a backup of the File before editing it.
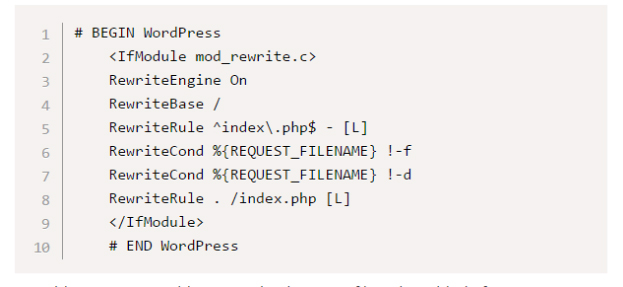
Below is how .htaccess looks like.
1. Restricting Admin Access
First, you have to restrict any other computer or device from accessing your website as the admin other than your device. You can do this by allowing your IP address only. If you have multiple devices, you can allow IP Addresses of each of them. After this, Even you can not access your Admin panel from anyone else’s computer from a security point of view.
Add the following code below #END WordPress, the last line in the .htaccess File. Place your IP address corresponding to the allow statement, and you can allow as many statements as you want.

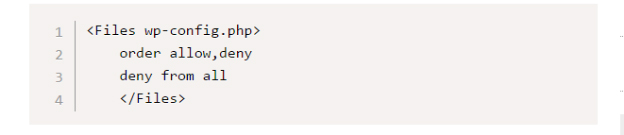
2. Protect your wp-config.php
WP-config.php is an important File, and it contains essential information about your website. To protect this, You can restrict access to your wp-config.php from everyone other than yourself. Place the following code snippet in the .htaccess at the lines’ end.
3. Ban hackers By Their IP Address
- Restrict WordPress dashboard to a single IP address
You can restrict the WordPress dashboard to a single IP address [admins IP address].place the following code.
 order deny, allow

# Replace the below 192.168.5.1 with your IP address

deny from all

allow from 192.168.5.1
In the above example, we allow only IP address 192.168.5.1 to access the WordPress admin dashboard.
- Restrict WordPress dashboard to multiple IP addresses
You can also allow access to the WordPress admin dashboard to more than one IP address.
As shown below, add a new allow from [IP ADDRESS] line before the last deny from all lines.
 order deny, allow

# Replace the below 192.168.5.1 with your IP address

deny from all

allow from 192.168.5.1

allow from 10.130.130.7
In the above example, we allow access to both IP addresses 192.168.5.1 and 10.130.130.7. Here, You can add as many IP addresses as you like.
4. Disable PHP Execution
Sometimes some themes have backdoors for hackers to hack your website if you use those themes. Most backdoor files are stored in different directories such as wp-includes and uploads.
You can stop hackers from backdoors by disabling PHP execution in certain folders. Use the following code to do that.

5. Disable Directory Browsing
Hackers can browse different directories of your website and do hurtful things like creating backdoors using the code snippet, deleting important files, and others. You can disable access to any folder with the following code snippet.

6. Restrict Access To WP-Content
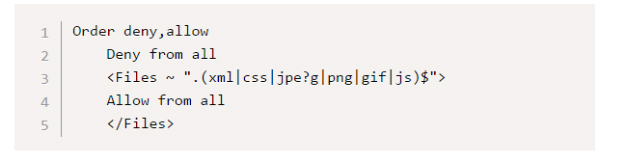
WP-Content is the most important folder for a website. All the theme files, plugin files, and images are stored in wp-content. If someone accesses that folder and deletes everything, your website is gone.
Place the following code snippet in the .htaccess File, and deny everyone access to the wp-content folder.
In short, The .htaccess file is a server configuration file supported by many web servers. You can protect the WordPress admin login with some .htaccess rules to prevent unauthorized login attempts.
We hope this has helped you!
Check our another guide on how to find and access WordPress error logs.