
A comprehensive guide to Robots.txt file in SEO.
New to robots.txt file in SEO? We have covered all the details here.
A robots.txt file is the most basic file on a website. It’s easy to learn, create, and implement on a website. However, it also gets messy easily, even if a single character is jumbled. This can hurt your SEO badly or even prevent indexing of your website’s important content. Thus, it’s crucial for you to learn all the essentials of the robots.txt file.
This blog post discusses what a robots.txt file in SEO is, how you can create it for your website, and how you can manage your website’s crawling.
What is a robots.txt file in SEO?
A Robots.txt file contains instructions that are used to signal search engine bots where they can and can’t go on a website. The specific instructions are known as “allow” or “disallow” directives that control the crawling behaviour of search crawlers on a site.
These files are used to inform search engines about crawling preferences and manage their crawling activities. The file contains a list of your site’s content and instructions that direct search crawlers on how to behave.
The robots.txt files are of great importance in SEO. They are used to prevent search crawlers or bots from crawling specific parts of your website.
How Robots.txt file is assessed by search crawlers?
Before crawling a website, search crawlers look for the robots.txt file of a website to check for the crawling directives. In case there’s no robots.txt file or no applicable directives, search crawlers will crawl the whole website, and in case of applicable directives, search crawlers will obey them and crawl accordingly.
Usually, most search engines consider the robots.txt file, but they may ignore certain directives in your robots.txt file. Even though robots.txt directives are strong signals, they are optional, not mandatory.
How does a robots.txt file appear?
A website’s robots.txt file looks like the following. It consists of the user agent and directives for search engines. A robots.txt file appears like this:
Sitemap: [URL location of sitemap]

User-agent: [bot identifier]

[directive]

[directive]

User-agent: [another bot identifier]

[directive]
This file might scare you if you are looking at it for the very first time. However, once you comprehend it, it will seem simple to you. To create a robots.txt file, you have to do is enter the user agent you want to instruct and then add the directives.
The basics of robots.txt in SEO
Now, let’s understand what each element in the robots.txt file stands for and how you can implement them.
#User Agents
The user-agent is the name of the particular web crawler to which you are sending crawl instructions. User agents differ amongst search engines, and each search engine has particular user agents. There are various user agents, but here are a few that are important for SEO.
- Google:
- Googlebot
- Googlebot-Image
- Googlebot-News
- Googlebot-Video
- Bing:
- Bingbot
- MSNBot-Media
- Yahoo: Slurp
- Baidu: Baiduspider
- DuckDuckGo: DuckDuckBot
Note: In robots.txt, all user agents are case-sensitive.
In your robots.txt file, you can instruct each user bot using specific instructions separately. You can add directives for as many user agents as you want. These directives do not mess with the other directives in the file, and each directive for each user agent act as clean instruction. However, if you add a user agent multiple times, the directives for that particular agent will be combined and followed accordingly.
For example: Here’s the crawling instruction for each search bot in a robots.txt file.
User-agent: Googlebot

Allow:/

User-agent: Bingbot

Disallow:/

User-agent: slurp

Allow:/

User-agent: Baiduspider

Disallow:/
Or, you can use the star (*) wildcard to instruct all user agents at once.
For example, the following are the instruction to block all the bots except Googlebot in a robots.txt file.
User-agent: *

Disallow: /

User-agent: Googlebot

Allow: /
#Directives
Directives are the instructions that are given to the user agents to obey and act according to them.
Some directives are supported by Google, and some are not. This is why it is important to learn to give the right directive to user agents.
1. Supported Directive
Includes the directives that are supported by Google.
-
Disallow Directive
This directive is used to instruct the user agents that don’t access the files or pages that come under that path.
For instance, if you want to allow access to Googlebot only and block the others. The robots.txt file will appear like this.
User-agent: *

Disallow: /blog

User-agent: Googlebot

Allow: /blog
-
Allow directive
This directive is also supported by Google as well as Bing and is used to allow crawling of a particular file or page except for explicitly disallowed.
For example: If you want to allow the crawling of a particular blog post by Bing and block all other blogs, your robos.txt file will appear like this:
User-agent: Bingbot

Disallow: /blog

Allow: /blog/allowed-post
In this situation, Bing can only access the /blog/allowed-post but can’t access any other post.
-
Sitemap directive
The “sitemap” is another directive that is supported by Google, Bing, and Yahoo. It is used to specify the sitemap’s location to search engines. In general, sitemaps are really important for SEO purposes as these disclose your site’s important URLs to search engines. These are required to submit to the Google search console. If you have submitted your sitemap to the Google search console, then you don’t need to include it in your robots.txt file again. However, including this in your robots.txt file is useful for other search engines, such as Bing.
Note: The sitemap directive must be used only once and should not be repeated for each user agent. This directive is applied to all the user agents. You can include it once at the beginning or at the end of the robots.txt file.
For example, the following is the robots.txt file containing the “sitemap” directive for all user agents (only at the beginning and once).
Sitemap: https://www.xyz.com/sitemap.xml

User-agent: *

Disallow: /blog/

Allow: /blog/post-title/
2. Unsupported Directives
This includes the directives that Google no longer supports.
-
Crawl-delay directive
Google no longer support the crawl delay directive anymore; however, Bing and Yandex still support it.
This directive was previously used to instruct search bots to specify a crawl delay. For example, earlier, you can set crawl delay for particular seconds if you want to delay a crawl. The below example shows that the directive instructs a crawl delay of 4 seconds.
User-agent: Googlebot

Crawl-delay: 4
-
Noindex directive
Google never officially supported the Noindex directive; however, it was believed that Google did. So, earlier, people used the Noindex directive when they wanted to prevent indexing of any file, page, or post. However, later Google explicitly announced that the Noindex directive is not supported by it. Additionally, Google suggests using the meta robots tag or X-robots HTTP header if you want to Noindex any file or page.
The below example displays the Noindex directive.
User-agent: Googlebot

Noindex: /blog/
-
Nofollow directive
Nofollow was another directive that wasn’t supported by Google. People used this to instruct search engines to bypass all the links on a page and not to follow them on the files, pages, or posts under the specified path.
However, Google later explicitly announced that it does not support the Nofollow directive. Also, Google suggested using the robots meta tags or the x-robots header to noindex all the links on a page. Moreover, it suggested using the rel= “nofollow” link attribute if you want to instruct search engines not to follow a specific link on a page.
The following is an example displaying the Nofollow directive in a robots.txt file that instructs search bots to ignore the links on the blog.
User-agent: Googlebot

Nofollow: /blog/
What happens in case of directive conflict?
As specified, robots.txt is simple yet gets messy easily if not handled carefully.
Let us give you an example.
User-agent: *
Disallow: /blog/
Allow: /blog
Here, the directives are quite confusing. The directives signal to disallow the /blog/ and allow the /blog.
So, what will happen in this case?
For Google and Bing, this is resolved, considering the number of characters. This means that the directive with the most character is prioritized, which is the “disallow” directive.
Disallow: /blog/ (6 characters)
Allow: /blog (5 characters)
What if both disallow and allow contain equal characters? In that case, the least restrictive directive is prioritized. And that would be the “Allow” directive.
This is mainly for Google and Bing, while the other search engines look for the first matching directive. Thus, for those, that would be disallowed.
How important is Robots.txt file in SEO?
Having a robots.txt file in SEO is not an absolute necessity, especially for smaller websites. However, it is still useful to have one. There are many good reasons for this. Robots.txt file gives you more control over your website and lets you manage the crawling activities of search crawlers, where they can and can’t go on your website.
In general, Google does not index the web pages blocked with robots.txt; however, this isn’t a guarantee that Google won’t index the pages. This is because Google says that the pages could still appear in search results if they are linked with other pages on the web.
Following are a few reasons why robots.txt files are important for any website.
Keep the website’s specific sections private – Using the robots.txt file, you can disallow user agents from crawling a specific section of your website effortlessly.
1. Prevent duplicate content crawling
Duplicate content must not appear on SERPs, so you can use the robots.txt file to block it from getting indexed and appearing on SERPs.
2. Prevent server overloading.
You can block unimportant pages from getting crawled and indexed by search crawlers. This will help you prevent server overloading.
3. Maximize crawl budget and reduce wastage
Crawling a website’s unimportant pages will waste the crawl budget and delay or prevent the indexing of important pages. Use the robots.txt file to block the crawling of unimportant pages and utilize the crawl budget for indexing your site’s important pages.
4. Prevent multimedia resources from appearing in SERPs.
Robots.txt files work great for preventing multimedia resources such as PDFs, videos, and images that are daunting to do in any other way.
5. Prevent internal search pages from appearing in SERPs
Your site’s internal search is useful for user experience, but these results should not appear in search results. You can employ the robots.txt file to stop your internal search pages from appearing on SERPs.
6. Specify the location of the sitemap
A Robots.txt file can also be used to specify the sitemap’s location to search bots to make the crawling process easier.
7. Specify a crawl delay-
Although Google does not support crawl delay, other search engines do. You can delay the crawl for seconds using the crawl-delay directive.
How to check any site’s robots.txt file?
Your site can only have a single robots.txt file. If you want to have one, check if you already have a robots.txt file or not to avoid any future mess.
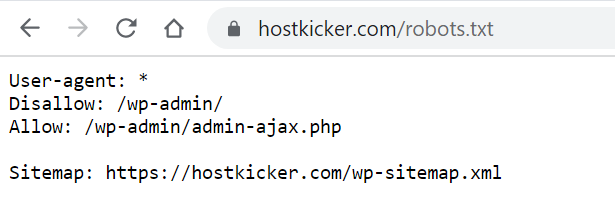
You can easily check your site’s robots.txt file at “yourdomain.com/robots.txt.” If you previously have a robots.txt file, it will be accessible at the link. Now, navigate to the URL and look for something like this. This is what our robots.txt file looks like.
If you don’t have one, let’s see how you can create a robots.txt for your website.
How can you create and submit a robots.txt file?
Follow these few steps to create a robots.txt file for a website.
1. Create a .txt file using the name robots.txt.
Open a blank .txt document and rename it as “robots.txt.”
2. Add the directives to the robots.txt file.
Once you have created a .txt file, specify the user agent and start adding the directives for your files, posts, and pages to instruct a specific web crawler whether you want to “allow” or “block” crawling. Continue adding the directives and stop once you have specified the instructions completely, and save the changes.
3. Upload and test your robots.txt file
Once you have saved your robots.txt file, you need to submit it to your site’s root directory of your subdomain. But how will you know if it is submitted successfully or not? You need to perform a test for this. You can visit your site’s robots.txt file at “yourdomain.com/robots.txt.”
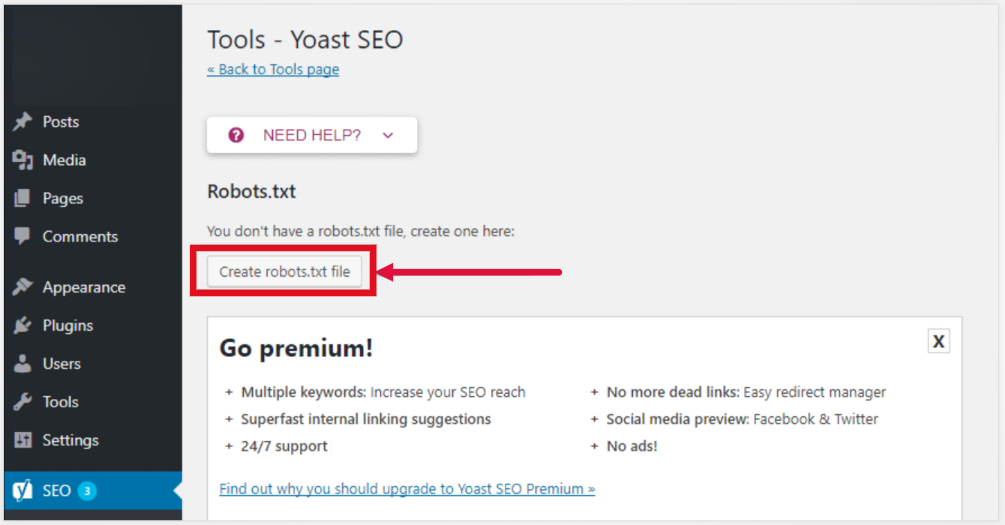
Besides this, you can also use a robots.txt generator or Yoast SEO plugin to create a robots.txt file easily. These tools can help you minimize errors and create a robots.txt file effortlessly. The only drawback of using the tools is they are less customizable.
Valuable tips for creating the Robots.txt file
Following are a few tips you need to keep in your mind while creating a robots.txt file. This will help you avoid common mistakes.
1. Create a clean robots.txt file -Use a new line for each directive.
Your robots.txt file should not be messy and confusing. Do not stuff multiple directives within one line, and use a fresh line for each directive.
Following are the example of both situations.
The wrong way: When stuffing all directives into one line.
User-agent: *

Disallow: /directory/

Disallow: /another-directory/
The right way: When using multiple lines for each directive.
User-agent: * Disallow: /directory/ Disallow: /another-directory/
2. Simplify your instructions
- Using wildcards (*)
Wildcards, the star symbol (*), can be used to simplify the instructions. You can use this (*) to instruct the directives to all user agents as well as you can match the URL patterns using wildcard when declaring the directives.
Let us give you an example of this. Suppose you are willing to block all the search engines from accessing your parameterized URLs of the products; you can declare it like this.
User-agent: *

Disallow: /products/t-shirts?

Disallow: /products/hoodies?

Disallow: /products/jackets?

…
That is correct; however, you can simplify the directives even more by using a wildcard. This is how you can do this:
User-agent: *

Disallow: /products/*?
This directive will block all the search engines from accessing all the URLs that fall under the path (/product/ subfolder) that includes a question mark at the end. To put it this way, all the parameterized product category URLs will be blocked by all search engines.
- Using “$” to specify the URL end
To indicate the URL end, you can use the dollar symbol “$”. Understand this with the following example.
Suppose you want to block all the search engines from crawling all the .pdf files on your website. In this situation, the robots.txt file may look like this-
User-agent: *

Disallow: /*.pdf$
This will prevent search engines from accessing all the URLs ending with .pdf. However, search engines can access the PDF with this “/file.pdf?id=6893” as it does not contain “.pdf” at its end.
Let’s see another example.
Suppose you want to disallow the URLs ending with .php. In this case, the robots.txt file will appear like this.
User-agent: *

Disallow: *.php$
This directive will block all search engines from accessing the URLs with the .php end. However, URLs like /page.php?lang=en can still be accessible as it does not end with .php.
3. Don’t repeat the user-agent multiple times-Use each once.
Repeating any user-agent multiple times might appear messy and confusing. Even though search engines will combine all the directives and follow them accordingly, it still isn’t a good practice. Using it will help you reduce confusion and avoid mistakes that may arise due to messy and confusing situations.
The wrong way-
User-agent: Googlebot

Disallow: /a/

User-agent: Googlebot

Disallow: /b/
The right way-
User-agent: Googlebot

Disallow: /a/

Disallow: /b/
4. Specify your preference clearly to prevent accidental errors
Unclear instructions may lead to unexpected results that may hamper your site. Suppose, on your multilingual site, you want to block an unfinished German blog and prevent it from appearing in search results that is available under the /de/ subdirectory. For this, you have instructed search engines using the following directive.
User-agent: *

Disallow: /de
This directive will instruct search engines to prevent everything from falling under that folder. However, since the directive is not so clear, it will also prevent the crawling of any file or page that starts with /de.
For instance:
/designer-dresses/
?delivery-details.html/ and more.
To resolve this, you only need to clarify your instruction. That is adding a trailing slash here. Now, the directive will instruct search engines to block the crawling of the German folder.
User-agent: *

Disallow: /de/
5. Including comments to explain the robots.txt file to Users
You can also leave comments in your robots file to help developers understand what you are actually instructing search bots. Let’s see how you can do this. This is done using the # symbol. Crawlers will bypass the line starting with the # symbol and follow the directives accordingly.
# This instructs Bing not to crawl the website.

User-agent: Bingbot

Disallow: /
6. Using separate robots.txt files for each subdomain
The crawling behaviour of a subdomain is controlled by the robots.txt file where it lies. In order to control the behaviour of another subdomain, you’ll have to create a separate robots.txt file.
For example,
Suppose your main site is hosted on xyz.com and your blog is hosted on blog.xyz.com; in this case, you’ll need two robots.txt files. One file is for the main domain’s root directory, and the second is for the blog’s root directory.
How to find your site’s robots.txt file issues?
Robots.txt files are simple but are prone to mess. Even a minor character mistake can cause a significant error on your website. And if not witnessed attentively, these errors can easily escape detection. This is why it is crucial to be on the lookout for mistakes.
You can use the “Coverage” report on Google Search Console to detect the issues related to robots.txt. Let’s see how.
Here, we’ll explain a few common errors you may come across, what they signify and their fixes.
1. Submitted URL blocked by robots.txt error.
You may encounter an error saying, “Submitted URL blocked by robots.txt.” This error signals that one or a few URLs that you have submitted via sitemap are restricted by robots.txt. You won’t witness this error if you have created your sitemap and robots.txt files cautiously. However, if you witness this error, determine the affected pages and modify your robots.txt file to remove the blocking directive to resolve the issue.
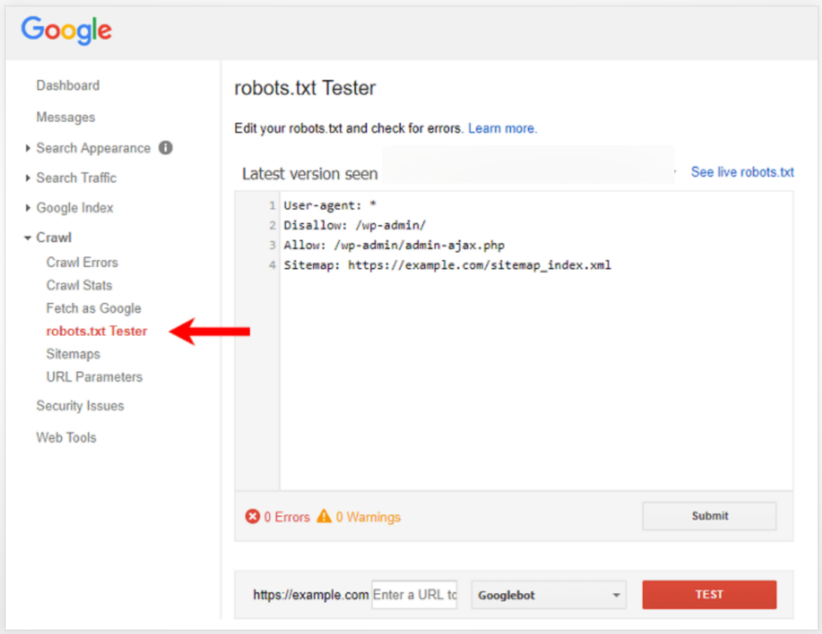
To detect the blocking directive, you can also use Google’s robots.txt tester, which can help you see the directive that is blocking the page.
Note: Be careful while using the robots.txt tester tool because a minor mistake can hamper other files and pages of your site.
2. Blocked by robots.txt error
You may encounter an error saying “blocked by robots.txt”, which signifies that your site contains files or content blocked by robots.txt. This error shows that Google hasn’t crawled and indexed that particular content yet.
Look for the blocked content and analyze whether you want to get it indexed or not. If it’s important and must be indexed, remove the blocking directive from robots.txt. Also, ensure that the content is not noindexed.
Note: If you intentionally blocked the content to prevent it from appearing in the search result, you need to remove the crawl block and use the x-robots-header or robots meta tag in place of it. These are effective in preventing the content from indexing rather than the robots.txt.
3. Indexed, though blocked by robots.txt error
Another issue you may encounter is the “indexed, though blocked by robots.txt” error. This error signifies that the content you blocked via robots.txt is indexed by Google.
Again, you need to analyze the content and figure out whether you want to remove it from indexing or keep it in Google’s index. If you wanted to get it indexed but blocked it accidentally, remove the blocking directive from robots.txt to enhance the visibility of your content. However, if you willingly used robots.txt to exclude it from indexing, then it isn’t the right way. You need to use a meta robots tag or x-robots tag HTTP header to prevent the content from appearing in search results.
# Want to check the errors on particular pages?
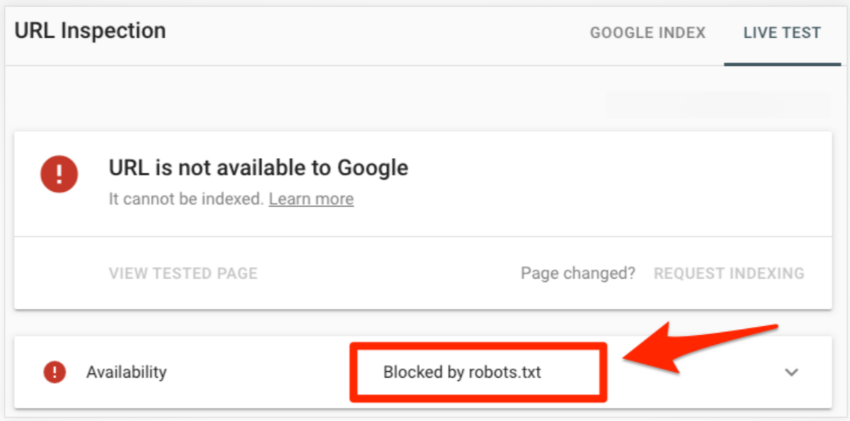
In addition to the errors listed above, if you want to check for issues related to particular pages on your site, you can use the Google search console’ URL inspection tool. Paste the URL of your page, and it will display all the errors related to the particular URL. For example: If the page is blocked with robots.txt, you will witness an alert that the “URL is not available to Google” and “blocked by robots.txt.”
Best practice for using robots.txt file in SEO
- Don’t block your site’s important content using robots.txt that you want to get indexed.
- Don’t use robots.txt to hide your private or sensitive data from appearing on search results. Instead, use a meta robots tag or x-robots tag HTTP header or password-protect them.
- The links on blocked pages by robots.txt won’t be followed unless the page is linked to any other indexable page.
- Google usually caches the robots.txt content for up to a day; however, it may cache it for longer. If you modified your robots.txt file and want to get it noticed quickly, submit the URL of your robots.txt file to Google.
- The file name of robots.txt must be only in lowercase. It can only be robots.txt, not Robots.txt or ROBOTS.TXT.
- A site can only have a single robots.txt file. Remember one site and one robots.txt file rule.
- Although search engines obey robots.txt, it’s still a directive, not an obligation.
To Conclude-
Robots.txt is very crucial in SEO. It helps you manage your website crawling by instructing search crawlers on what they can and can’t crawl on your website. Anyone unfamiliar with robots.txt may wonder why to hide pages or files from search engines when the major goal of any website is search visibility. However, after going through the text, you might have clearly understood what a robots.txt file in SEO is, how to create it and why it is important. It’s a simple file that can help you enhance your search visibility if used wisely. Make sure to implement it the right way, or else it can hurt your website greatly or even prevent your site’s crucial content from appearing on SERPs.
Setting up a robots.txt file for any website is easy and straightforward. Afterwards, you can make necessary changes from time to time to manage your future content’s crawling.
Remember that the robots.txt file can make significant differences in your site’s SEO if you implement it wisely. If you haven’t done it before, be confident, give it a try, and take control of your website in your hand.
Hope! This write-up has helped you comprehend robots.txt files in SEO easily.