Creating A Portfolio Website Using React
This article will help you in creating a website or web application with the help of React.js and deploying it on GitHub. For that, we will also look at some basics of React that are necessary to complete this portfolio. React.js is a library of JavaScript that is useful for the development of user interfaces and their components. The engineers of Facebook worked to create the library and it has gained a lot of popularity today.
Basics Of React.js Components
Components in React can be thought of as classes or functions. Optional inputs can be given to these components called props. A component can be used for splitting a user interface into sections that are independent of each other, including header, body and footer. Each component works independently, meaning each component can be referred into a React document object model without having an effect on the rest of the page.
There is a lifecycle that allows the developers to define various snippets of code they wish to execute in accordance with the state of that component such as mount, render, update and unmount. Components in React also have their own trade-off. Components can be reused by exporting them to other components, but it can lead to complexity, with different components triggering and talking to each other.
GitHub can be used for easy deployment of a website. It is free and does not require you to set up any infrastructure. It has modules that help you set up things easily.
Getting Started
Before you begin on the website, have a look at your resume to decide what content should be displayed on your portfolio website. It will also develop an understanding of what the website should look like. You can also browse to see other portfolio websites or find templates online for your website. You can sketch out the look of your site on pen and paper before you begin the actual coding.
Setting Up The React App
You can make use of a module to create a React app that will build the application quickly and easily. Open up the console and install the module. Run the module to create a file structure that looks as follows:
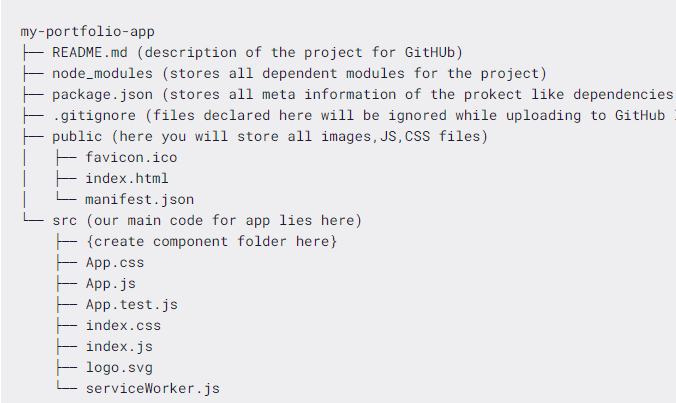
Next, create the folder for components under the directory src. This file will be used for storing the components in the project. The images, the HTML code, the CSS files and the images should be kept in a public folder. Install the dependent modules. If all steps have been successful, the npm command will open and start the React application.
Breaking Down React Components
The HTML template in the components file will be broken down into components and combined to make the React application. You need to identify the components that can be used in creating from the HTML file. These can be the header or the footer. You can start with tags that are not nested, those that will have the code for one section which is not dependent on the rest of the program.
If it gets confusing, try to keep your focus on the concept of simple HTML components in the codebase. Once you become comfortable with the use of React, the implementation will be easy. The code will also need to be changed from HTML to JSX and an online convertor can be used to do so. Once you are ready with your components, the only thing left will be to combine them under a .js file of your portfolio application.
The components will first have to be imported so that the render() method can be used. The mom command needs to be run on the terminal and then the changes will be seen on the site. Even if the command is not run and further changes are made, if saved, they will be reflected automatically. The development can be quickly done with a reload feature. You can amend the HTML and CSS code script to make changes to the content displayed in accordance with your resume. You can try separate fonts, add colour or images, it is your decision.
Deploying React Application On Github Pages
After all the work, the last step to complete is the deployment. First, you would need the installation of the npm library by running the npm command in the gh-pages terminal. Then run the deployment and your application will be deployed after the scripts have been executed. The link you are given in the homepage field will help you in determining whether the deployment has been successful.
Deployment needs to be done with safety tests, removal of internal links or passwords, any information that you would not want people to have. If you will have to make regular changes the deployment should be done after every change in the codebase. The deployment process can also be automated, meaning the commits made to the master branch will trigger the site to become available.