Easy way to add image icon with navigation menu in WordPress
Images are an excellent way to grab users’ attention and convey information efficiently. The images in the navigation menu can help visitors understand your website’s navigation quickly, allowing them to efficiently navigate to your site. With images, you can also highlight the most important content or CTA (call to action) of your navigation menu. Are you here to learn the effective way to add image icon with navigation menu in WordPress? You’ve landed right.
In this blog, we’ll discuss the easy methods to add an image icon with navigation menu in WordPress. So, without much ado, let’s get started.
Why should you add image icon with navigation menu in WordPress?
![]()
The WordPress navigation menus are typically plain text links. These text links are valuable for websites to ease site navigation and work well for most websites. However, they don’t look much engaging and might appear boring and simple.
So, you can make your site navigation interesting and engaging by adding image icons to the navigation menu. This way, you can attract your visitors to the menu and encourage them to explore more of your site.
Moreover, if your navigation menu contains a lot of options, the image icons can make it easier for your website visitors to quickly scan the content and discover what they are looking for.
This can ultimately enhance the page views and lower the bounce rate of your web pages.
Furthermore, you can even use the image icon to highlight the important menu items on your site. By highlighting your CTAs, you can increase your signups, sales, and conversions.
So, let’s explore different ways you can use to add image icons to your WP navigation menu.
Methods to add image icon with navigation menu in WordPress.
In this section, we’ll explain two easy methods to add image icons with navigation menu in WordPress. The first method uses a plugin and is suitable for novice as well as skilled users, and the second method is for experienced users with more or less coding experience.
Let’s dive into the details of the methods.
1. Add image icon with navigation menu in WordPress using a plugin.
The first and easiest method to add image icons to your navigation menus is by using a plugin. There are many plugin options out there, but you can use the Menu Image plugin. The plugin is easy to use and comes with dashicons icons that you can easily add with a few clicks.
The plugin is flexible and also allows you to use the Font Awesome icons if you’ve added those to your WordPress website.
In addition, if you desire to utilize your own icon files, the plugin also lets you select an icon or image from your WordPress media library.
Install Menu Image Plugin
First of all, you need to install the plugin. From your admin dashboard, navigate to the plugins and install and activate the Menu Image plugin on your site.
If you are new to WordPress, check our beginner guide on plugin installation.
Configure plugin settings
After plugin installation and activation, you need to configure plugin settings to get started with the Menu image plugin.
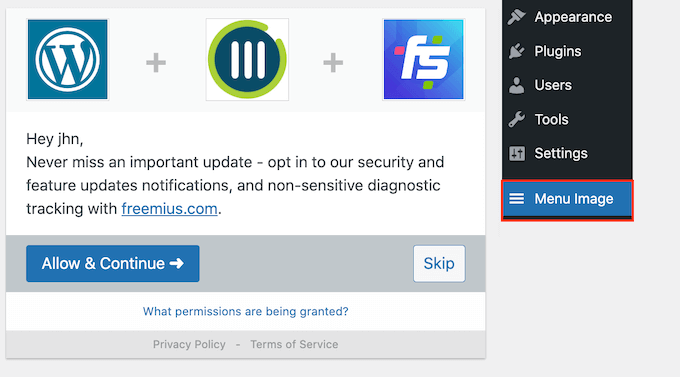
Navigate to your admin dashboard and click on Menu Image. On the next screen, you can opt to get security and feature notifications or simply skip to move to the main settings.
i. Image on hover
First, you need to configure the ‘Image on Hover’ feature. When adding icons to your navigation menu, you’ll witness an “Image on hover” option. This feature enables you to display a different icon when a visitor hovers over a particular menu item.
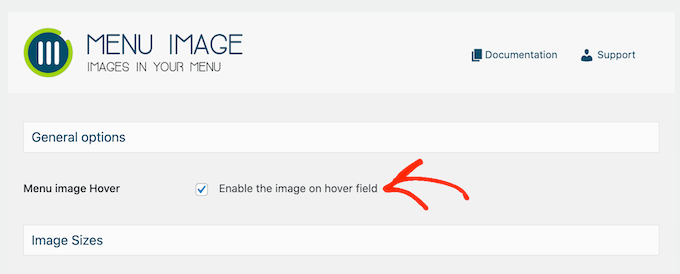
Keep in mind that this “Image on hover” feature is only visible when you are using your own images for image icons. If you plan to use Font Awesome icons or dashicons, you don’t need to worry about this setting.
You can utilize this feature if your navigation menu has a lot of options. This is because displaying a different icon for a particular menu allows it to contrast with others and helps visitors to determine where they are on the menu. So, despite using a different color for the currently-selected menu item, you can try different hover effects. To test the hover effects, select the ‘enable the image on hover field’ option.
ii. Set Image icon size
Now, you can select the image icon size as per your choice from different given sizes.
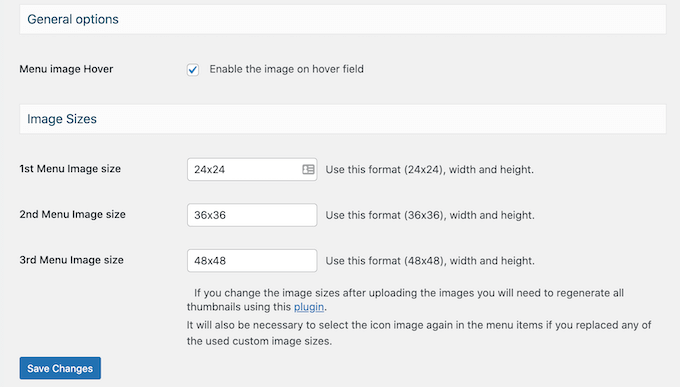
If you want to use the Font Awesome icons or dashicons, the menu image will automatically resize the icons. But, if you want to use images from the media library, you need to set the image icon size manually.
By default, the plugin supports the default WP image sizes, such as thumbnail, image, and large. By default, it also offers three different sizes, including 24×24, 36×36, and 48×48 pixels.
These sizes are suitable and work well for most websites. But you can adjust the size simply by typing different numbers for the 1st, 2nd, or 3rd Menu image size.
After that, click on the ‘save changes’ button to save your configurations.
iii. Add image icon to navigation menu in WordPress.
Now, to add image icons to the navigation menu, navigate to Appearance>>Menus. WordPress will display your site’s main menu by default.
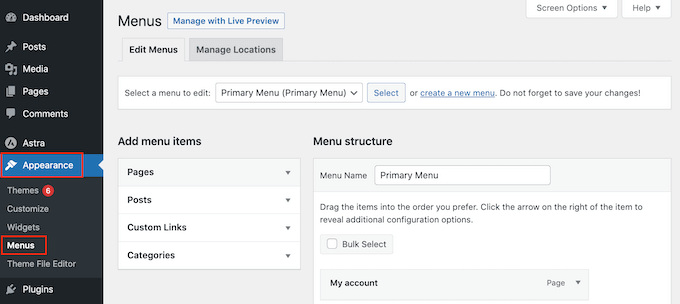
If you want to add image icons to a different menu, click on the ‘select a menu to edit’ dropdown and select the menu you want to edit, and then click on the ‘select’ option.
Next, look for the first menu item to add an image icon and click it. After that, select the new ‘Add Image /icon’ tab.
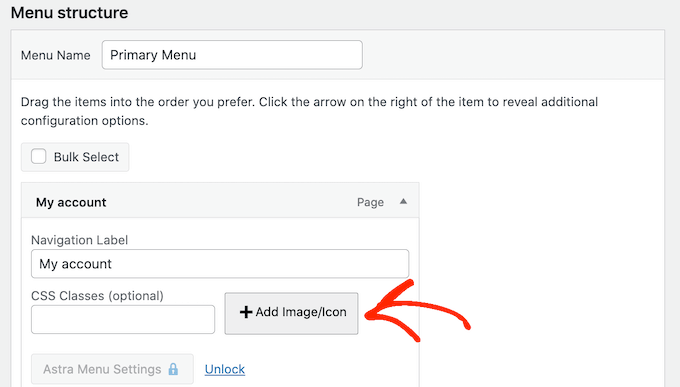
Now is the time to decide whether you want to use your own image or choose an icon.
If you want to use the ready-made icon, click on the radio button in front of the ‘Icons.’ Next, you can choose any Dashicon or Font Awesome. Select the icon and then click on save changes.
![]()
On the contrary, if you want to use your own images, select the radio button in front of the ‘Images’ and click on the ‘Set Image’ link.
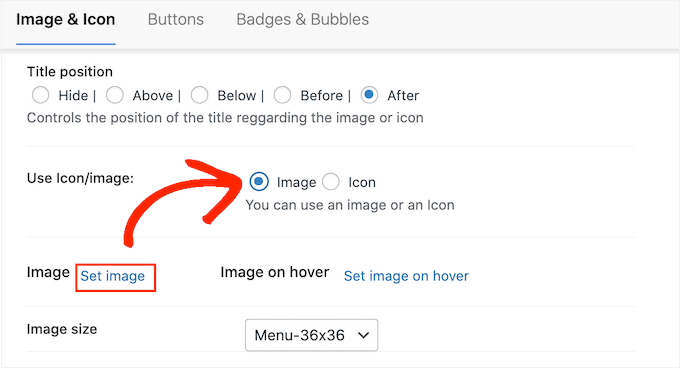
Now you can select an image from your WP media library, or you can upload a new image from your computer.
In the previous plugin settings, if you selected the ‘Enable the image on hover field,’ then you’ll have to click on ‘Set image on hover.’
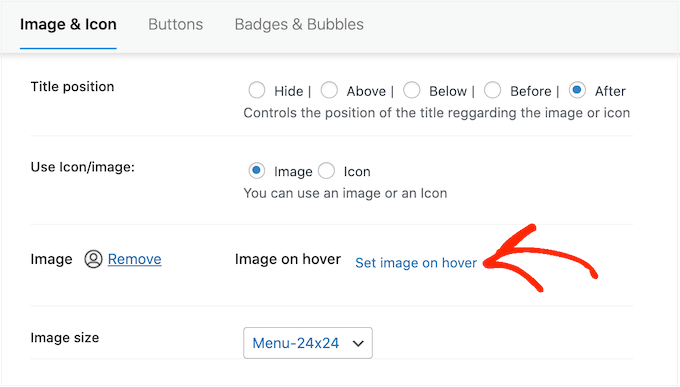
Then, select an image to display to the visitors when they hover over this menu.
If your want to ignore this setting and display the same icon, click on the ‘set image on hover’ and select the exact same image option.
Note: This setting is important because if you don’t configure this, the icon will disappear when the visitors hover over the menu.
Set Image Size
Next, you need to select the size of the image. Click on the ‘image size’ dropdown option and then select a size.
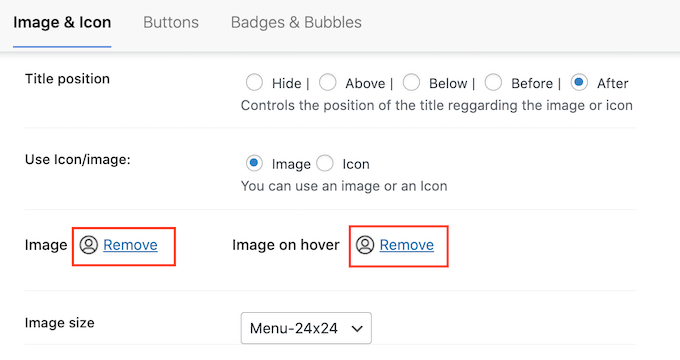
You can also use the same image size for all icons. This makes your navigation menu appear more organized. However, you can also use bigger image icons for your important menu items to make them stand out.
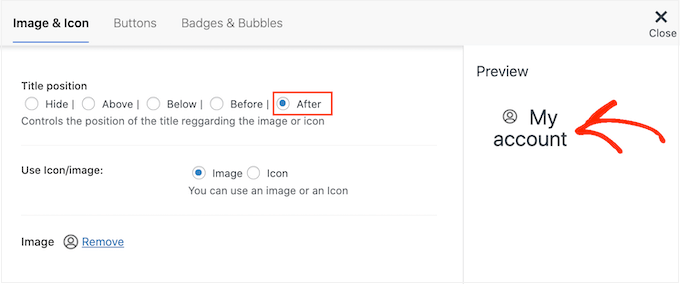
Moving further, once you are happy with your icon, you need to check the label of the menu item. The plugin, by default, displays the title label ‘After’ the icon, by default. If you want to change this setting, navigate to the ‘Title Position’ section and select any option you prefer.
In the title position section, you’ll witness a ‘hide’ option that allows you to remove the navigation label completely.
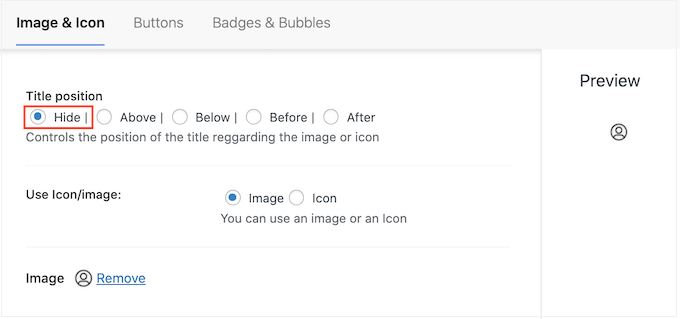
This can create an icon-only navigation menu, making your menu uncluttered. However, this is not a recommended option because only icons can create confusion and make users struggle to navigate your site.
Once you are happy with your configurations and your navigation menu appearance, click on the ‘Save Changes’ button to store your changes.
Similarly, add icons to your other menu items.
Once you’ve finished adding the icons to all menu items, click on the ‘Save Menu’ button.
After that, visit your website to witness the newly updated menu with icons.
2. Add image icon with navigation menu in WordPress using code.
The second method to add image icons to your navigation menus uses custom CSS. This method is a bit complex but gives you more flexibility over menu customization. Due to the involvement of coding, the method is recommended for intermediate or advanced WP users.
Upload image files to the media library.
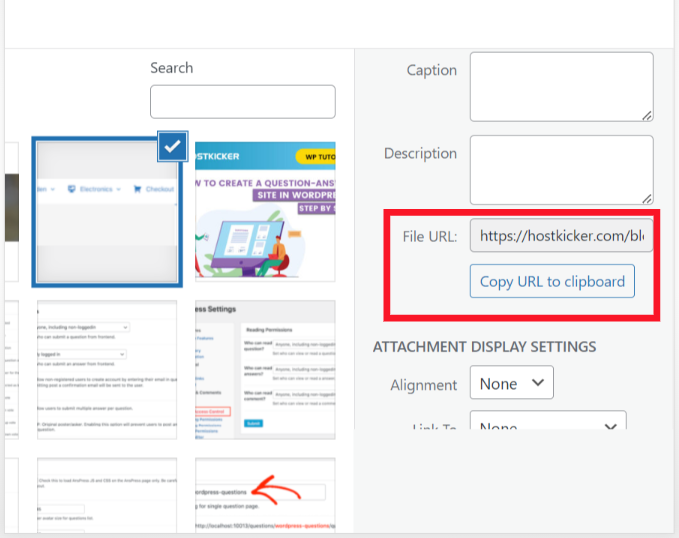
Before we get started with this method, upload your image files to your WP media library. Also, write down the image URL for each image in a notepad or spreadsheet. You’ll need these links for the code, so this will save you time and ease your work.
You can easily find the image URL in your WP media library. Select the image, and you can see the file URL next to the file URL field.
Select Menu
Now, navigate to your admin dashboard and head over to Appearance >> Menus.
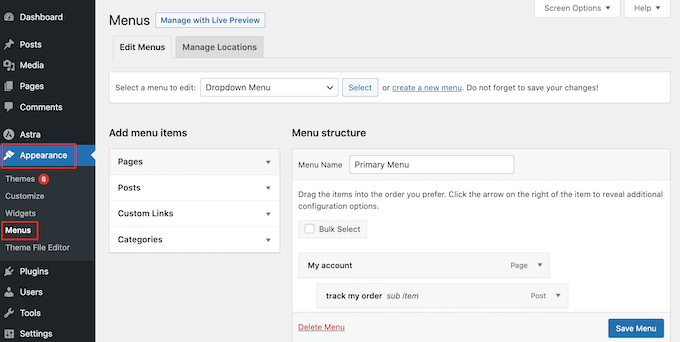
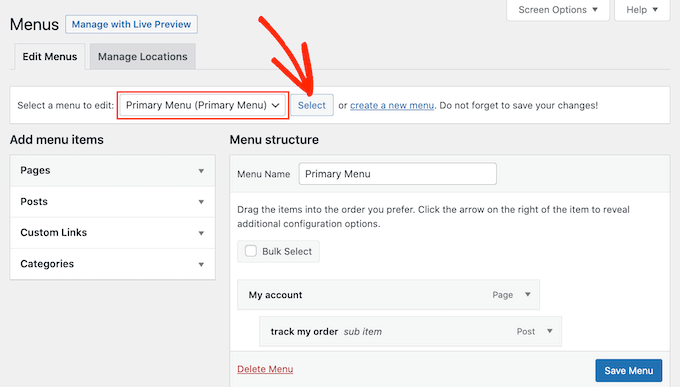
Click on the ‘Select a menu to edit’ dropdown and choose a menu to add the image icons, and click on ‘Select.’
After that, click on the ‘screen Options’ and enable custom CSS classes. Next, check the box next to ‘CSS Classes’ in the panel that appears.
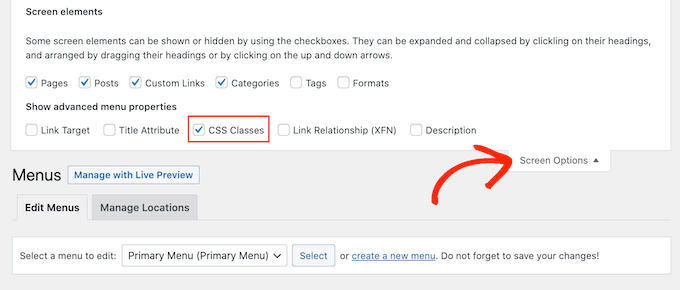
Now, you can easily add custom CSS classes to your navigation menu items. This way, you can link each menu item to an image in the WP media library.
Next, you need to name the CSS classes. You can name it anything, but it’s better you use the name that makes it easier for you to identify the menu item.
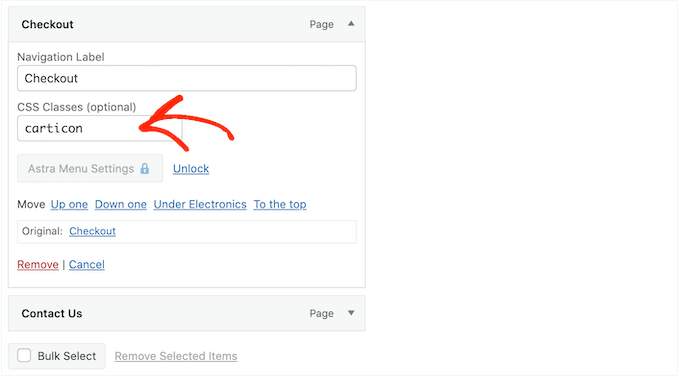
Now, click on the first item to which you want to add an image icon. In the ‘CSS Classes Optional’ field, enter the name you want to use.
Make a note of these custom CSS classes in a separate place, as you’ll need this in further steps.
Then, follow a similar process to add a separate class to all your menu items. Then, click on the ‘Save Menu’ button to save your changes.
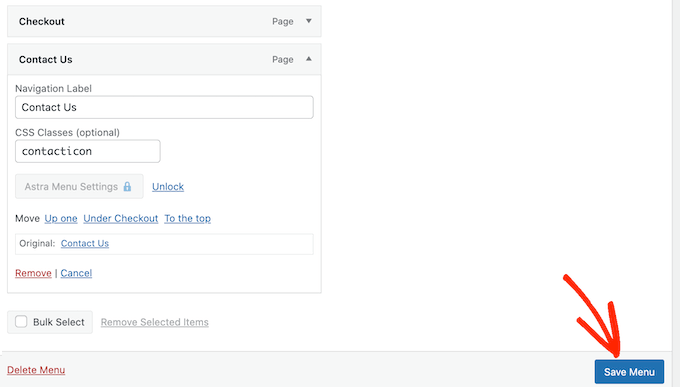
Please note that each icon will be linked to its own CSS class. So, make sure to label the menu items differently.
Now, you can add image icons to the navigation menus in WordPress using CSS.
Install and activate WPCode.
For this tutorial, we’ll use WPCode to add code snippets. It’s a widely used WP plugin that allows you to easily add custom code without requiring you to edit the theme’s function.php file of your website.
First of all, install and activate the WPCode plugin on your site.
Get started with WPCode.
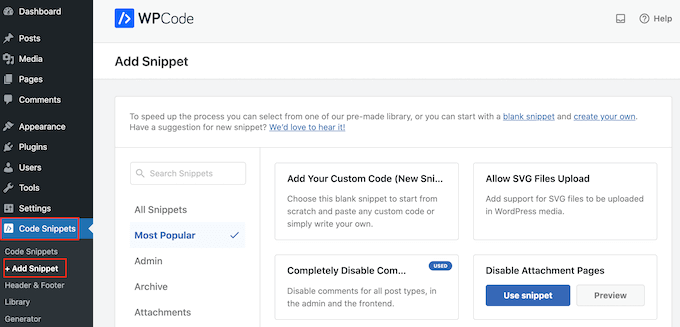
Then, Navigate to Code Snippets >> Add Snippet.
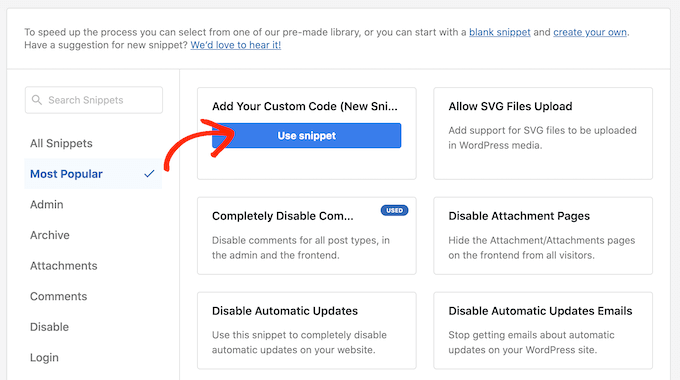
On the next screen, hover the cursor over the ‘Add Tour Custom Code’ and then click on ‘Use Snippet.’
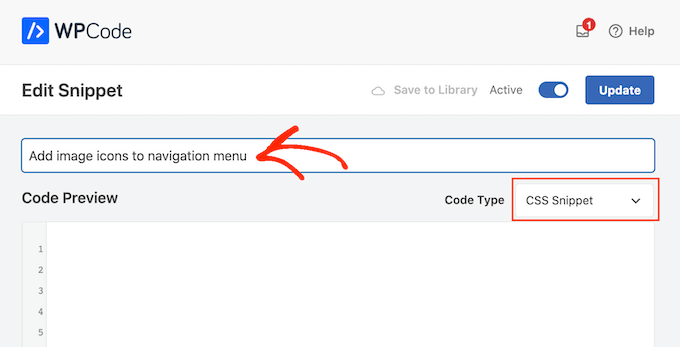
Now, enter the title for the custom code snippet. Keep the title simple, as it can help you identify the Snippet in the WP dashboard.
Next, click on the ‘Code Type’ dropdown and select the ‘CSS snippet.’
Following, in the code editor, you need to enter the code for each icon you want to show in your menu.
Here’s the code you can use after customizing it for your website.
Change the ‘carticon’ to the custom CSS you created previously. Here, you need to replace the URL with your image URL (you noted previously.)
.carticon {

background-image: url('http://localhost:10013/wp-content/my-media/cartcheckout.png');

background-repeat: no-repeat;
background-position: left;
padding-left: 5px;
}
Note: Keep the dot ‘.’ in front of the CSS class in the code snippet. This will indicate to WP that it’s a class and not any other kind of CSS selector.
Next, you need to modify the given Snippet for each menu item you created above. For this, you can simply copy-paste them all into the ‘Code Preview’ Field.
When you are done with the code, scroll down to the ‘Insertion’ section.
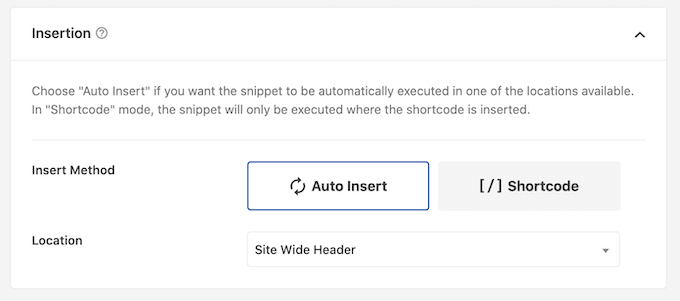
WPCode can easily add to various locations, including frontend only, admin only, or after every post.
If you desire to use the custom CSS throughout your site, click on the ‘Auto insert’ option if it is not already selected.
After that, click on the ‘Location’ dropdown menu and select ‘Site Wide Header.’
Then, scroll to the top of your screen and activate the ‘inactive toggle.’
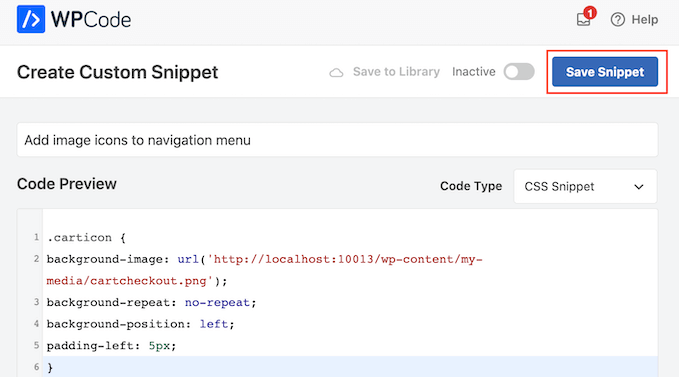
Store your changes
Finally, click on the ‘Save Snippet’ button to save your changes and make your custom CSS live.
You can now visit your site to witness the updates menu and see the image icons in your navigation menu.
Based on your website theme, if your image icons are misplaced, you might require to modify the CSS to display the image icons in the right place.
If so, navigate to Code snippets >> Code Snippets in your WP dashboard.
Then, Hover over the Snippet and click on the ‘Edit’ link.
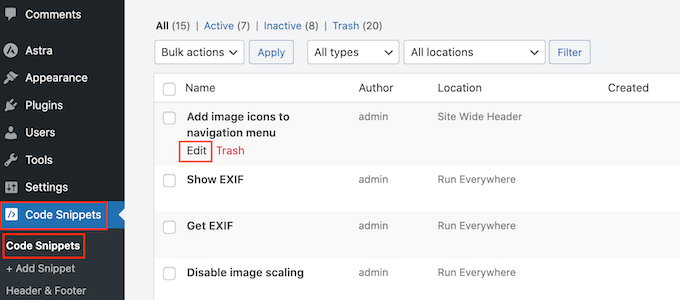
On the next screen, you can make the necessary changes inside your code editor.
That’s it. You have successfully added image icons with navigation menu in WP.
To Conclude
So, this is how you can add an image icon with navigation menu in WordPress. Here, we’ve discussed both methods in detail to help you better understand the process and easily add image icons to your website’s menu. The first method is the most straightforward and suitable for all. The second method is especially for skilled users who have some prior coding experience.
So go ahead with the method that suits you the best and make your website navigation menu attractive.