A comprehensive guide to create a WordPress Website
Do you wish to create a WordPress website but lack technical knowledge or coding skills? It’s fine. You can still create a professional-looking website effortlessly and launch your dream website on your own.
Creating a website might seem intimidating to beginners, and they often turn to web developers to avoid any mishap and end up paying a huge amount.
Many novice users also believe that creating a website necessitates a professional developer with extensive technical knowledge and coding experience. However, this is not always the case.
Anyone can easily and effortlessly create a beautiful-looking and highly responsive website without technical expertise.
If you’ve dreamt of creating a website on your own, we are here to assist you and turn your dream into a reality. This step-by-step easy-to-learn tutorial is for you and all non-techy users who want to create their website on their own.
Here, we’ll go over the specifics of creating a website in the most basic way possible and enable you to create a WordPress website from scratch.
Now, without digressing, let’s dive deeper into the specifics of building a website.
Let’s begin!
The requirements to create a WordPress website
Since we are starting from scratch, you’d only need three basic things to embark on your website creation journey. The requirements are:
1. Right WordPress plan.
2. A reliable and steadfast Web hosting service.
3. A domain name.
Let’s go over each and help you understand their significance before we begin the website creation process.
1. Right WordPress plan.
Did you know WordPress is available as WordPress.com and WordPress.org?
Novice users often get confused between WordPress.com and WordPress.org and opt for the wrong WordPress platform to create their website. That’s why it’s vital for you to understand the difference and make an informed choice.
i. WordPress.com
WordPress.com is a hosted WordPress platform that provides you with all website-related services under the same roof. It’s an easy-to-use platform that allows you to create an account and choose a plan to get started. It offers various plans, including free, personal, premium, business, and eCommerce, with wide price and feature ranges.
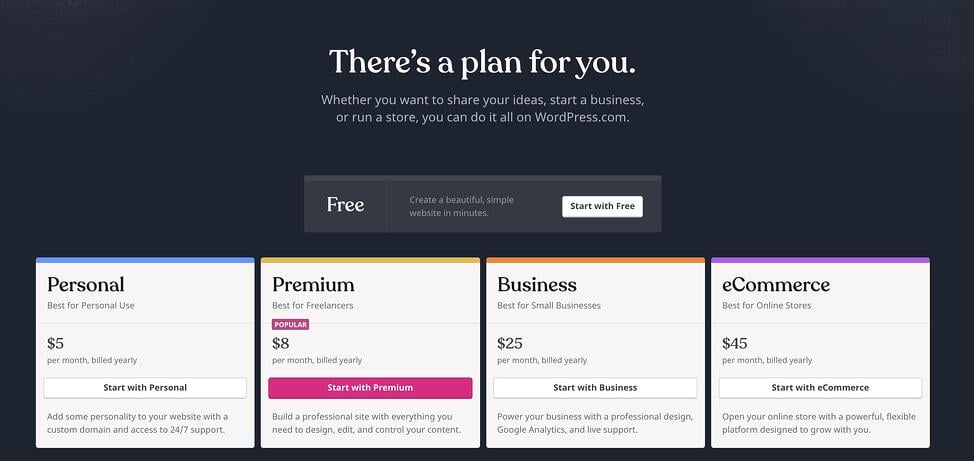
To get started, you can create an account, choose the free plan, get a subdomain name, and start your small personal blog. However, the free plan comes with some drawbacks. It doesn’t provide you with more customization features and places ads on your site, making it slow to load. In addition, your website will use a subdomain like “yourdomain.wordpress.com,” which appears less appealing and less professional.
If you desire to use a custom domain like “www.yourwebsite.com” and require more features, you need to upgrade to a higher plan.
However, WordPress.com doesn’t give you advanced customization and monetization options which pushes users toward using wordpress.org.
ii. WordPress.org
WordPress.org is open-source CMS software that is free to use, but you have to pay for all the other things that are required to establish a website. It’s a self-hosted platform and is the one that people usually refer to when say, WordPress.
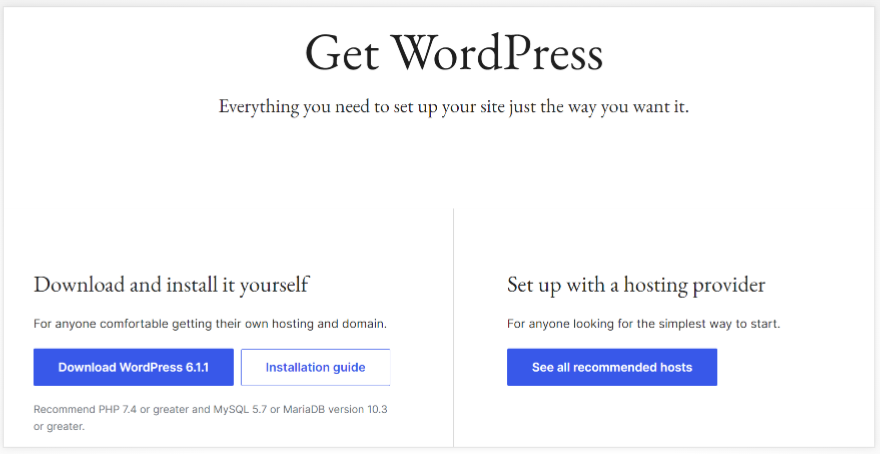
WordPress.org comes with great responsibilities since you need to take care of everything, but it gives you more control over your site. In addition to the core software, wordpress.org comes with free themes and plugins.
To create a WordPress website with WordPress.org, you have to purchase web hosting and a domain name and download and install the software on your hosting.
Moreover, WordPress is a highly customizable and monetizable platform. If you want to add additional functionality and need more customizations and control over your site, you can install additional plugins and themes of your choice.
To summarise, WordPress.org is an ideal solution if you desire to take your business to the next level. It gives you more control and more customizations without any restrictions and allows you to design any type of website that you may think of.
2. A reliable and steadfast Web hosting service.
Now that you have understood the difference between both platforms, next, you have to understand the hosting services.
Dependable and reputable hosting services are crucial to go live and supporting the website’s online visibility.
There are numerous hosting providers in the market that offer attractive hosting services, which makes it more challenging for users to choose the best of all.
Wondering how to choose the best host? Don’t worry. We’ll help you with that too.
Firstly, compare all the reputable and reliable hosting providers, including their prices, plans, services, and add-ons, and choose the most profitable one.
Next, decide on the plan you want to purchase. Most hosting providers offer three major hosting plans Shared, VPS, and dedicated. Let us give you an overview of each plan to help you decide the best.
- Shared web hosting- In this, different websites are hosted on the same web server and share the same resources. It’s the most affordable web hosting service and is mostly suitable for small websites with less traffic.
- VPS web hosting-In this, websites are hosted on virtually separate servers with specified resources. It is more secure and pricy than shared hosting and is suitable for small to medium websites with less to moderate traffic.
- Dedicated web hosting- In this, a website is hosted on a dedicated server and is provided with dedicated resources and a highly secure environment. It is expensive of all and is suitable for large websites with massive traffics.
All plans have their pros and cons and vary in their prices & features from host to host. You have to choose the most featureful and advantageous hosting provider and the plan depending on your website’s needs.
3. A domain name.
Next, you’d need a domain name to establish a professional-looking website.
A domain is your website’s address on the web which people will use to reach your site. You have to choose an easy-to-remember, unique domain name to establish your brand’s identity and help users easily navigate to your site.
Many web hosting providers offer domain name registration services under the same roof to enable users to purchase hosting and domain from the same place. You can buy a domain from your hosting provider or purchase it from an independent third-party website.
Now that you have understood all the essential requirements you’d need to create a WordPress website, it’s time to take the next step and dive into the process of creating a WordPress website.
Easy steps to create a WordPress website.
In this section, we’ll go over the process of creating a WordPress website the easy way. Follow the mentioned process step by step and create your dream website effortlessly.
1. Get reliable web hosting & a domain name.
As we have already discussed what web hosting provider and domain name is and how you can choose one for your website, now is the time when you have to purchase web hosting and a domain name for your website. Ensure to choose a reliable, reputable, and steadfast web host to enable your website to perform better on SERPs.
At Hostkicker, we offer highly efficient and affordable hosting services, including various plans starting at just $1 and domain registration services which provide you with plenty of domain choices at reasonable prices.
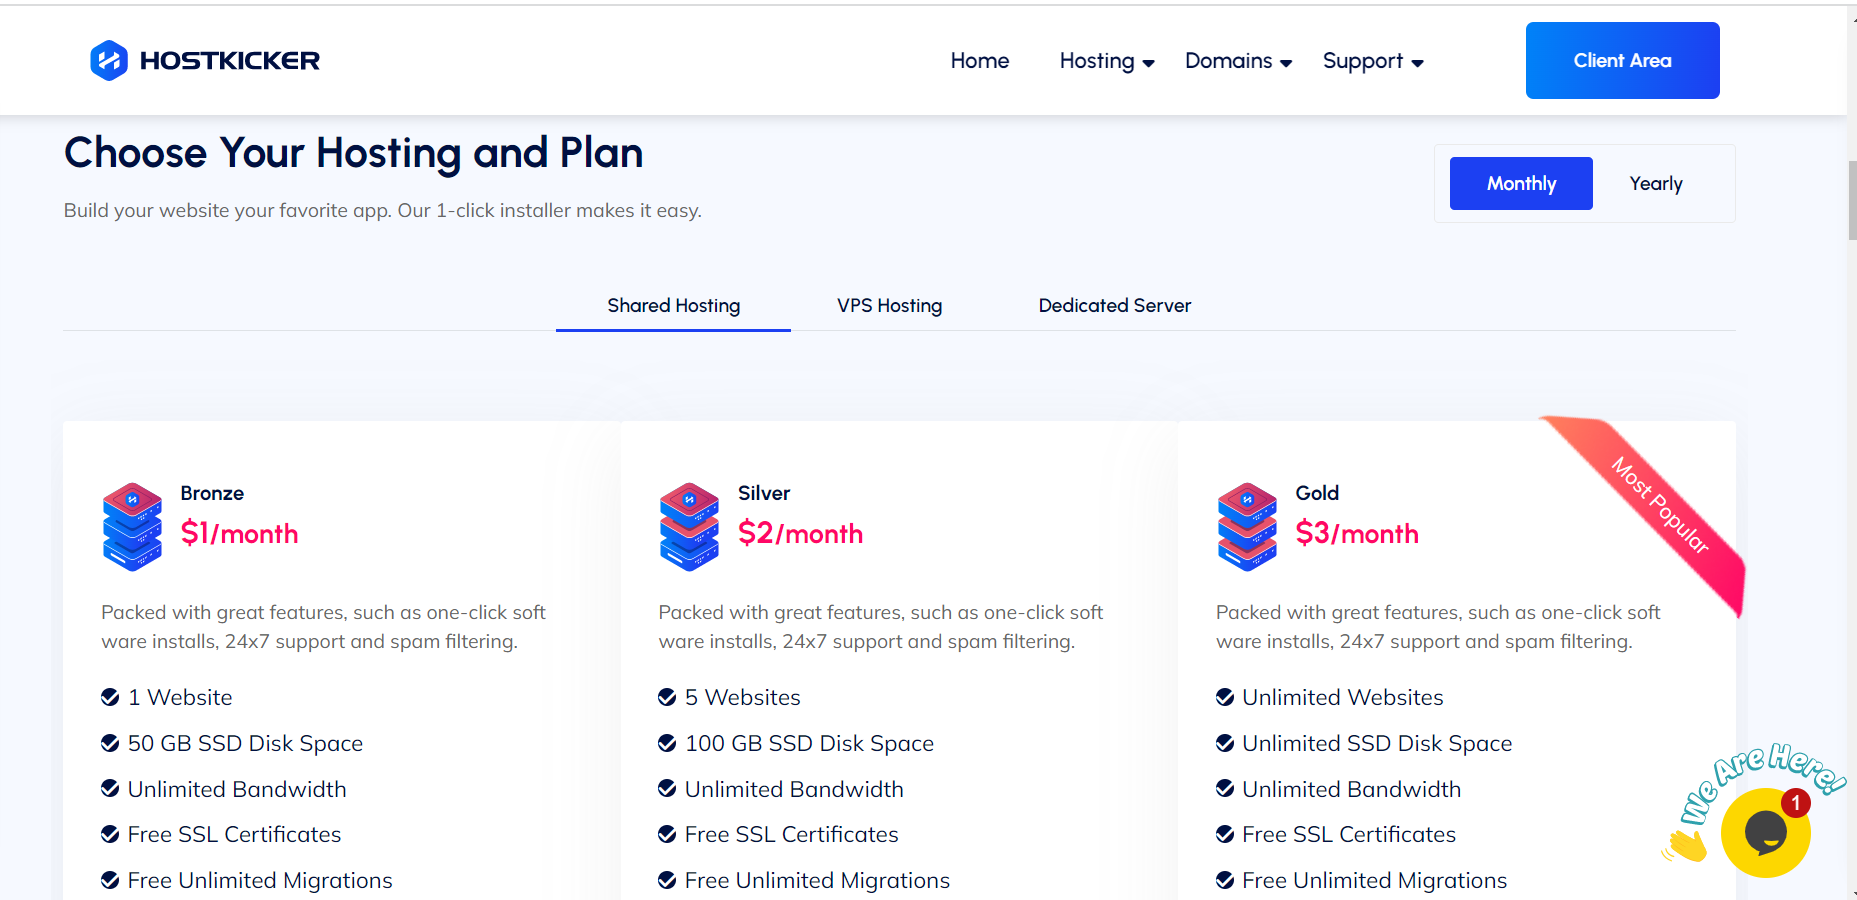
You can visit our site to check all our proficient hosting and domain name options and proceed with the one that meets your need.
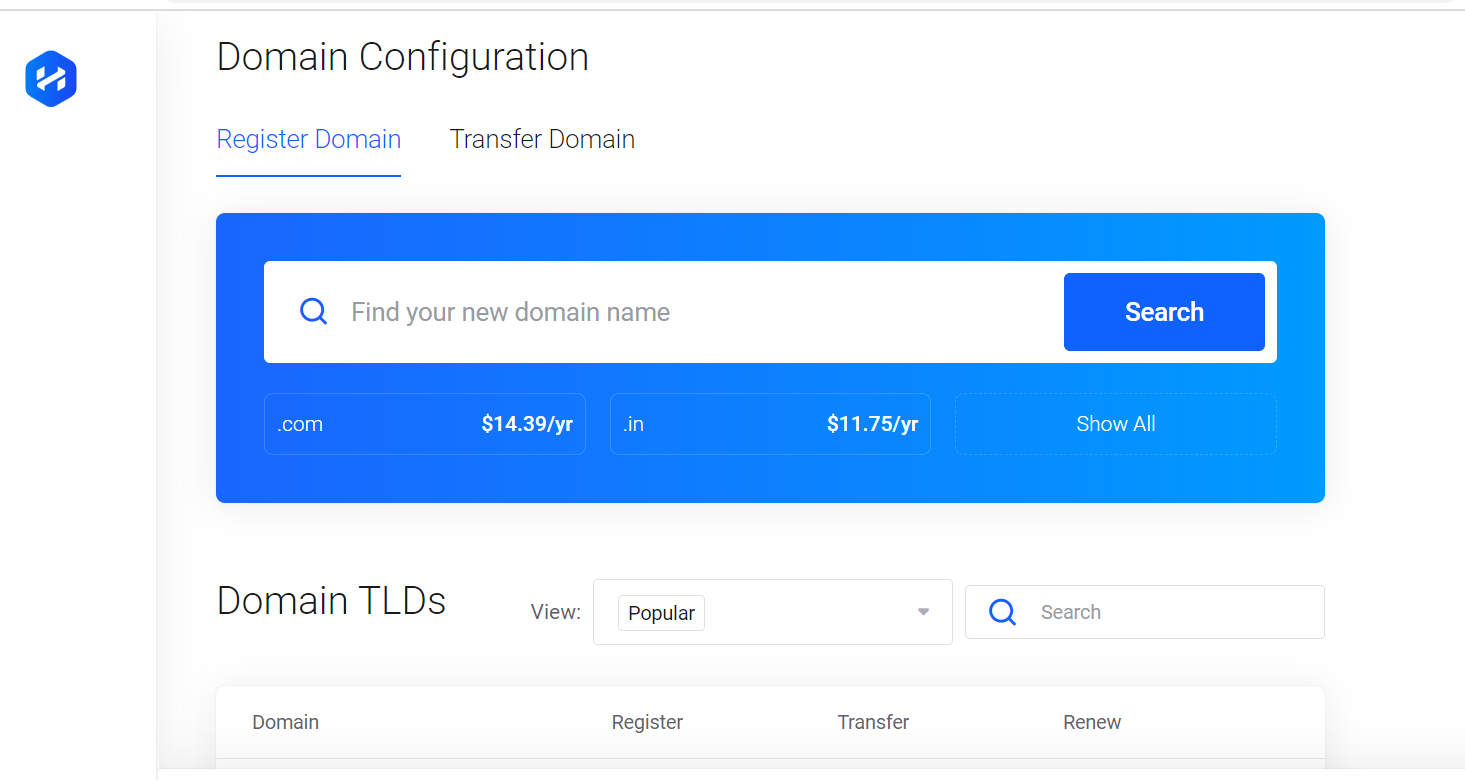
Note: Feel free to select the web host of your choice and proceed with the following steps to create a WordPress website. For this blog, we have used Hostkicker as our web host.
2. Choose the right WordPress plan (WordPress.org).
Once you purchase a domain name and web hosting, next you have to choose the right WordPress platform. As we’ve discussed all the benefits of self-hosted WordPress.org, we’ll continue with it to create a beautiful-looking WordPress site.
3. Set up your website
Next, you have to set up your website. Once you purchase the plan that fits your needs from the hosting provider of your choice, you have to connect both your hosting account and your domain name. Your hosting provider will provide the credentials of your account and other hosting details on your registered email to get started.
To connect the domain name with your hosting, you need to visit your domain registrar and enter your web host name servers.
We are using Hostkicker as our web host, so our nameservers look like this:
ns1.hostkicker.com
ns2.hostkicker.com
ns3.hostkicker.com
ns4.hostkicker.com
Once you enter your nameservers, you have to wait for a few hours to get connected. Then, jump to the next step.
4. Install WordPress.
Next, log into your hosting cPanel (control panel) using your cPanel credentials. This will be your hosting dashboard from where you can manage your website and from where you’ll be able to download and install WordPress software.
This process can be different with a different host.
Note: We offer a one-click app install to our users to ease their installation process. Similar to us, some web host provides a one-click WP install, whereas some have to follow the whole installation process. Depending on your host, install WordPress on your account.
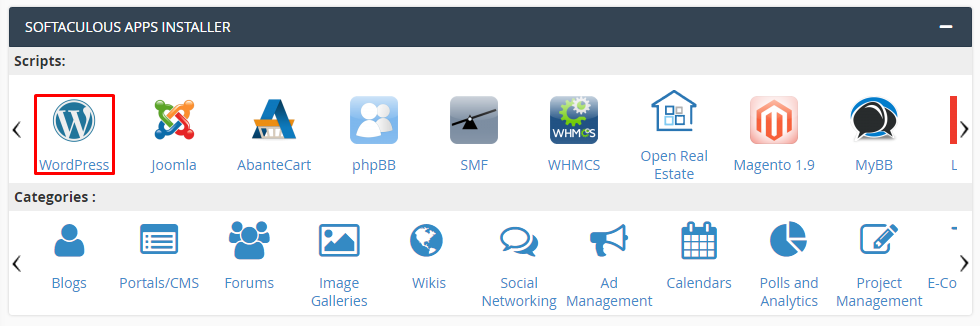
Once WordPress is set up on your account, you are ready to customize your website.
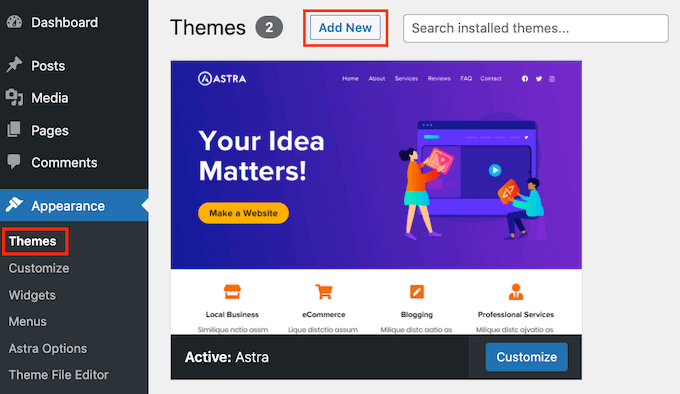
5. Select a theme for your WordPress website.
Themes are templates that control the visual appearance of your site, which include multiple layouts, colors, fonts, formatting styles, and more that give a website an appeal.
There are hundreds and thousands of valuable WordPress themes (free & paid ) from which you can choose the most suitable and attractive theme for your website.
By default, the WordPress site comes with a basic theme; however, you can change it as per your choice and niche.
You can continue with the theme if it suits you or change it from your WordPress admin dashboard. Simply visit Appearance>>Themes>>Add New to explore the plenty of theme options and select the best fits your need.
6. Add content to your website.
Now that you have established a professional-looking website successfully, it’s time to add content to your website. WordPress, by default, comes with two content types, namely posts and pages. Posts are part of blogging functionality where you can add content that needs to be regularly updated, whereas the pages are part of a static website that is meant for publishing static content such as the about page, contact page, terms, and services page, etc.
WordPress, by default, display blog post on the front page of your site. You can easily change that and display any static page, such as the home page of your website. Also, you can create a separate page for your news or blog section to display your posts. Contrarily, you can create a website without any blog or news page.
Let’s begin adding content to your site.
Note: If you don’t have any content for your site at the moment, you can always edit your posts and pages and update them later.
i. Add pages to your website.
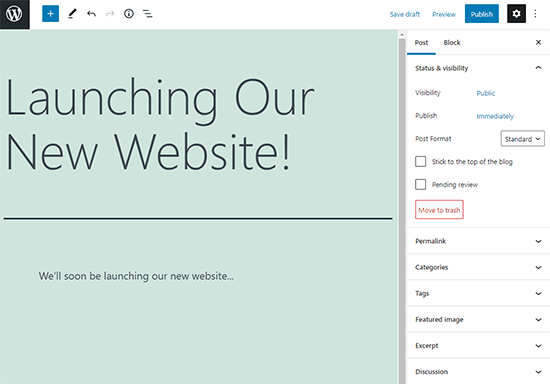
To add a static page to your site, log in to your admin dashboard & navigate to Pages>> Add New. This will lead you to the page editor screen, where you can add your content.
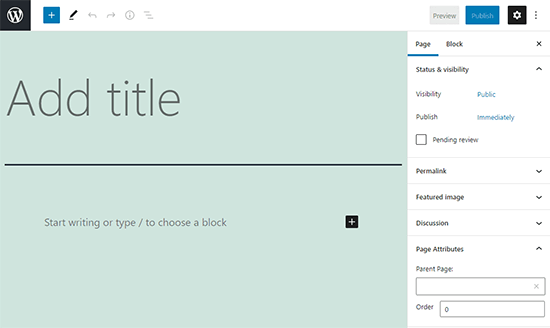
Note: The page editor screen will look similar to this but may look different depending on your theme.
Now, give your page a title, let’s say “Home,” and then add content in the text editor below. You can add anything you want to display to your users, be it text, images, links, embed videos, audio, etc., based on your preferences, and then click the ‘publish button’ to make the page live on your website.
Similarly, you can repeat the whole process to add more static pages to your site. For instance, the about us, contact us, privacy, blog, news, etc.
ii. Add posts to your website.
Similar to pages, you can create posts as well. To add posts, log into your admin dashboard and navigate to Posts>> Add New. This will lead you to the post editor screen, where you can add your content. This post editor screen will be much similar to what you saw in your page editor screen.
First, add the post title and then the post content in the post editor. After adding your content, you can hit the ‘save draft’ button to save it or hit the ‘publish’ tab to make it live on your site.
That’s it! You have successfully learned to add posts and pages to your website. Similarly, you can easily edit, update, remove, and add posts and pages to your site effortlessly.
Till now, you have learned to create a website and add themes and content to your website.
Let’s move a step forward and help you customize your website. There’s much more on WordPress that you can learn to customize your website and add additional functionality to it.
7. Customize your website.
As of now, you have learned to create a website and add content to your website. Read on to learn some website customization tactics to customize your website and give your website a decent and attractive appeal.
Let’s start with setting up the front page(homepage).
i. Set up a static Home Page.
If you run a business, to give your users an orderly appeal to your website, you have to set up a static environment to make your site easy to understand and navigable.
Log into your admin dashboard and navigate to Settings >> Reading page.
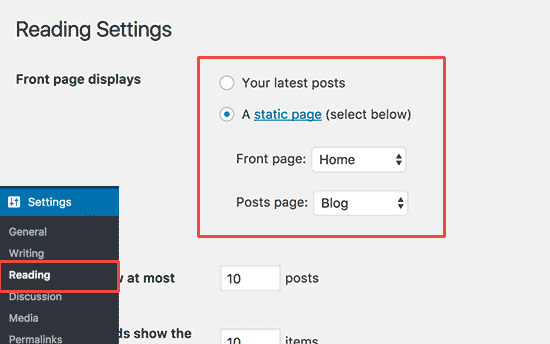
Next, look for the “Front age display” option and select the “static front page.”
Then, select the “Pages” you created for your home page and blog pages.
Now, tap on the “save changes” option at the bottom of the page to save your modifications. Your website will now display the ‘home page’ as your front page and the ‘blog’ page to show your blogs.
Contrarily, if you are a blogger or like and want to provide your users with a dynamic appeal & your latest content at the top, use the “latest post” option.
ii. Set up your permalinks.
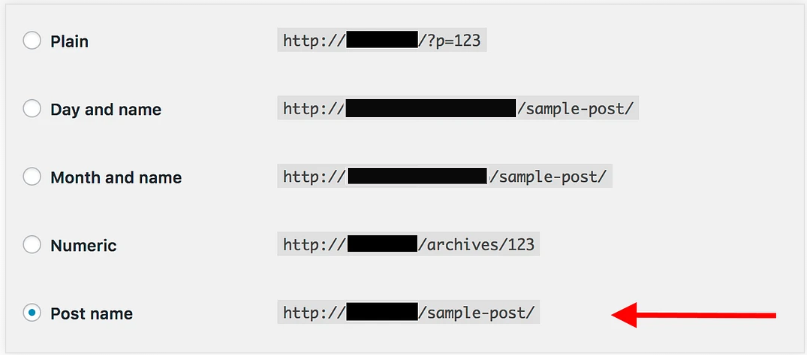
Permalinks are the URLs that display the structure of your web page address within your website.
There are multiple options for setting up the structure of your URL, including plain, date and name, month and name, and numeric and post name. You can choose any, but keeping SEO in mind, make sure you go for the post name.
It is the most optimized URL structure, which includes the title of your web page.
For instance, for the about page, your URL should be like- example.com/about; for your specific blog page, the URL should be like- example.com/blog/your page title.
To set your permalink properly, log into your admin dashboard, navigate to Settings >> Permalinks, and then select the “Post name” and “save changes.” Now, your URLs are set appropriately from an SEO perspective.
iii. Change your Site Title & Tagline.
Your site title and tagline represent your brand and may appear in multiple places.
In order to change your site’s title and tagline, log into your admin dashboard and navigate to Settings >> General.
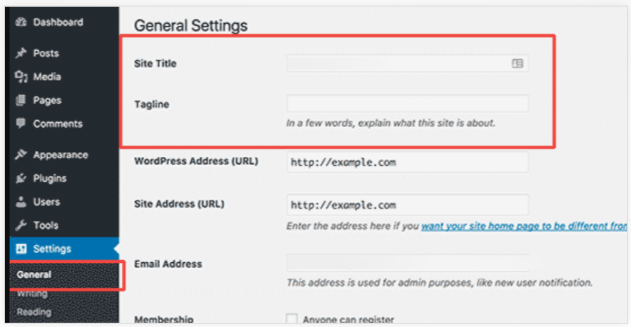
Next, enter your website title and tagline. The title will be your website name, like Hostkicker, and the tagline will be a brief description of your brand.
Now, tap on the “save changes” option to store your modifications.
iv. Setup your comment settings
WordPress, by default, comes with a comment feature to help you boost customer engagement with your brand. This allows users to leave comments on your posts. However, this could be a major target of spammers, which can keep your hands busy dealing with numerous spam comments.
Still, it’s up to you to allow or disable comments on your posts.
In order to modify your comment settings, enable comment moderation on your site.
From your dashboard, navigate to Settings >> Discussion page. Here you can modify the settings as per your desire.
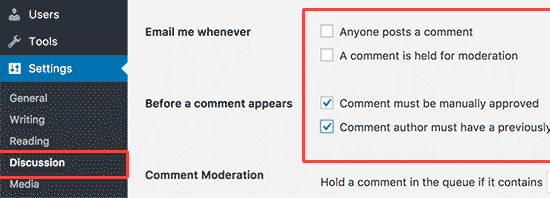
Navigate down to the “Before a comment appears” option and tick the check box next to the “Comments must be manually approved” option.
After making the desired changes, don’t forget to “save the changes.”
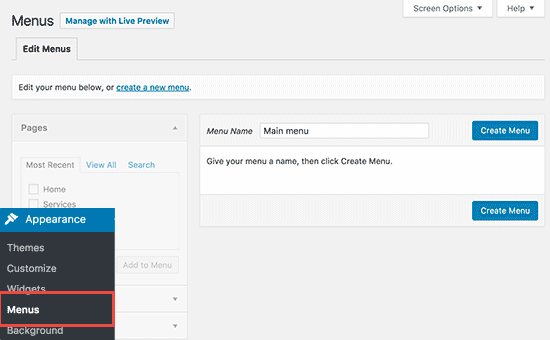
v. Set up Navigation Menus.
Moving on, next, we’ll help you create navigation menus for your website. Navigation menus are valuable for users and allow them to navigate to different pages of your website effortlessly.
WordPress, by default, comes with a strong navigation menu system that lets you display the menus on your site beautifully.
In order to add a navigation menu to your website, visit Appearance>> Menus from your admin dashboard.
Then, add a name for your navigation and tap on the “Create Menu” button to create your website menu. As of now, this menu is empty.
Next, you have to select the pages that you desire to add to show in your website menu and then click on the “add to menu” option.

Now, the selected pages will appear in the empty menu area, displaying the menu structure. You can rearrange their position in your site’s menu.
Next, you have to select the display location of your site’s menu.
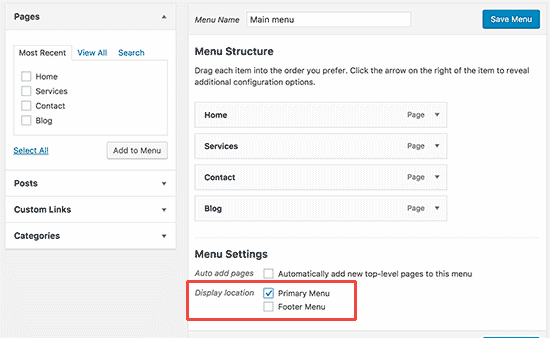
The primary menu will appear in your website’s header at the top, and the next will make it appear in your site’s footer. Select your preference, where you want to show your navigation menu (Recommend-Primary menu), and then hit the “save menu” button to store your modifications.
vi. Make your website public.
Now that you’ve created a website and customized it you may want that search engines can find and index it properly to make them accessible to your users.
For this, navigate to Settings >> Reading and look for the search engines visibility option.
It’s set by default, but to double ensure, examine that the check box before “Discourage search engines from indexing this site” is UNCHECKED.

8. Install plugins on your website.
After setting up your WordPress website, you may want to add additional features and customization to your site. WordPress lets you add these using Plugins.
Plugins are software or apps that come with varying functionalities such as security, SEO, image optimization, and much more. You can choose from hundreds and thousands of free & paid plugins to add features to your site simply by downloading them to your site.
In order to install plugins, navigate to the plugin page from your admin dashboard and search for the plugin you want to install.
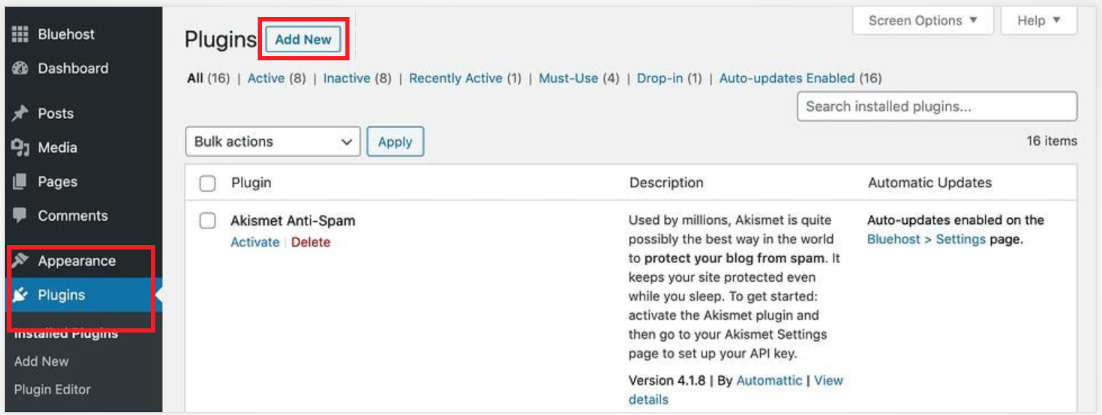
Make sure you only install the plugins that are required. You can also see our easy tutorial on WordPress installation.
9. WordPress Website Quick Tips and Tricks.
Now that you have successfully created a fully functional WordPress website, it’s crucial for you to maintain it & help it reach its intended audience and succeed online.
Here, in this section, we’ll provide you with some quick tips to make the most out of your website.
i. Reach out to WordPress support whenever in need
While creating a website or after, whenever you need assistance, you can reach out to WordPress support anytime for help. Also, there are numerous other ways to resolve your WordPress concern. Plenty of WordPress how-to guides are available online that you can benefit from, or you can reach forums to get your concern resolved.
ii. Always prioritize users
Users are the pillars of your online success. Therefore, always make sure to focus on users to provide an excellent user experience first and search engines next.
iii. Optimize your website holistically
Learn SEO and make sure to take care of every SEO aspect-the on-page optimization, off-page optimization, and technical optimization in order to optimize your website holistically and help it gain increased search ranking, enabling it to reach its intended audience and avail increased return on investment.
iv. Track your website performance
Assessing what’s working and what’s not will help you dig out your flaws and your strengths and determine your next move and take necessary steps accordingly. You can utilize multiple tools such as Google Search Console, Google Analytics, and more to ease your process.
v. Create your social presence
Social platforms are valuable for enhancing brand awareness and reaching a wider audience to gain multiple SEO and marketing benefits. Create your social presence on multiple platforms to avail and help your brand reach greater heights.
vi. Back up Your website regularly
Backing up website data is vital for data safety and security. Make sure that you take regular backups of your website so that you can have your data safe in case of any technical failures or malware attacks.
vii. Learn from your competitors
when beginning your online journey, you might find it challenging to do everything rightly. Therefore, learning what your competitors are doing and how they are performing will clarify numerous things for you and get a way out to move ahead strategically.
viii. Stay Up-To Date-Always
Last but not least, always stay updated. Always use the latest version of the WordPress site and plugins to ensure your site remains fresh and secure all the time and performs efficiently.
Create A Beautiful WordPress Website & Help Your Business Go Above And Beyond!
So that’s it. You have learned to create a WordPress website successfully following the easiest way.
Creating a website might seem daunting to many, but you’ve just seen how easily you can create a WordPress site.
Now is the appropriate time for you to create your dream website effortlessly. This thorough guide is sufficient for you to create your online presence on your own without requiring tech support or hiring a web developer.
Moreover, creating a website does not end your duty. You have to make continuous efforts to drive increased traffic to your site and help it grow.
Hope this guide has helped you create a fully-responsive and professional-looking website.
Good luck with your Digital journey!