
Easy way to clone a WordPress website: Step by Step
Are you looking for an easy way to clone a WordPress website? Whether you are a skilled web developer or a beginner, the process of cloning a website can be significantly helpful for web admins.
There could be a lot of reasons that you might need to clone a WordPress website. Whether you are willing to migrate to a new web host, looking to create a backup of your site to keep your data safe, or setting up a staging website for a development environment, whatever the reason is, in this step-wise tutorial, we will walk you through the entire process. By going through this tutorial, you’ll discover that cloning a WordPress website is not as complex as it seems.
So, without further ado, let’s dive into the easy process of duplicating a WordPress website.
What is website cloning, and why is it necessary?
Website cloning is the process of duplicating or copying an existing website entirely to create an identical version for any reason. It can be done for a variety of reasons, such as data security, management, and web development. Website cloning allows web admins and developers to test or accomplish their purposes without impacting the actual website and its presence on the internet.
Some of the key reasons why website cloning is necessary are:
i. Quick and proper Migration: Website cloning is helpful when you want to move to a new web host or a new domain. Cloning streamlines the migration process and minimizes the risk of disruptions as it allows you to set up a new environment and ensure everything works fine before making the switch. In addition, you may be a web developer who designs a website for your clients on your local host. After completion, you can easily clone the website and move it to your client server to make it live.
ii. Staging environment: Website cloning helps you create a staging environment/website where you can test the compatibility of the new updates, themes, or plugins before implementing them to your live site. Also, you can experiment with new features, design changes, or any other modifications without impacting your live site. This prevents any potential issues and disruptions and allows you to make an informed decision as needed.
iii. Backup website data: Website cloning allows you to back up your data, which they can use to quickly restore your site in case of any data loss, hacking, or any other issue. This prevents data loss and minimizes site downtime.
Steps to clone a WordPress website.
Now that you know what website cloning is and why it is necessary, here are the easy steps you need to follow to clone your WordPress website. The method is beginner-friendly and does not require any expert knowledge.
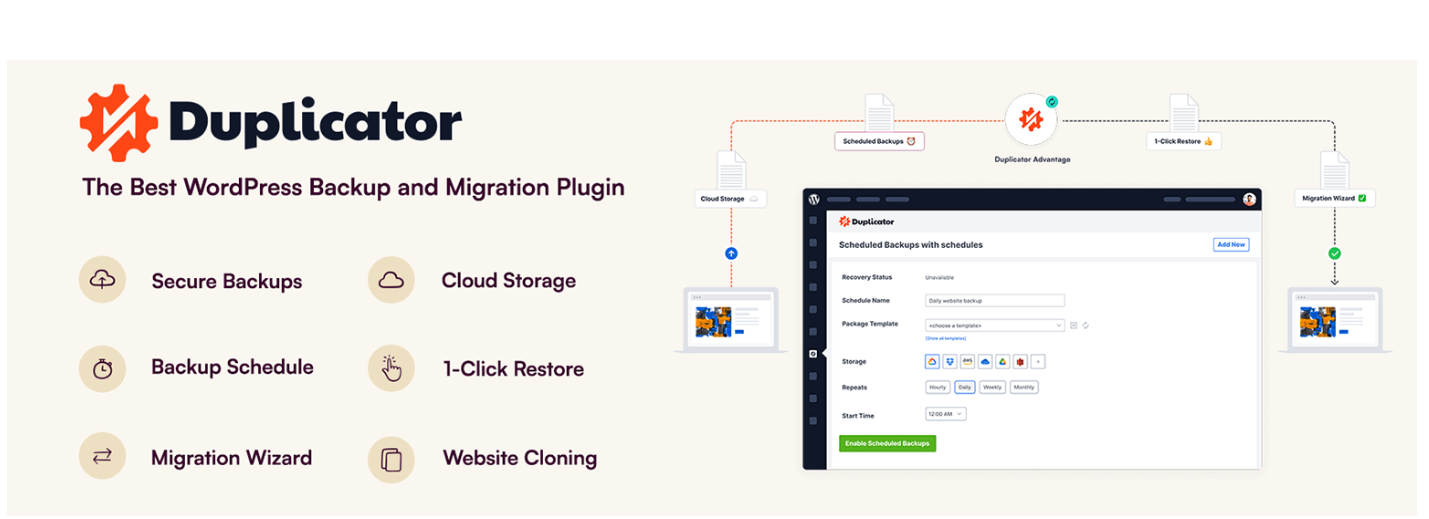
1. Install and activate the Duplicator plugin.
The simplest and most user-friendly method to clone a WordPress website is using a plugin. There are various plugins, but for this tutorial, we are using the Duplicator plugin. It’s an effective and user-friendly plugin that allows users to easily clone a website. The plugin lets you back up all your website data into a single file, enabling you to easily move it to a new location. So, first, install and activate the duplicator plugin on your site that you want to clone. If you are a beginner, you can refer to our easy guide on how to install a plugin on WordPress easily. Once done, you can move to the next step.
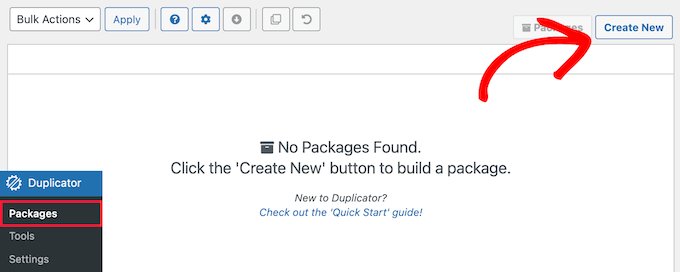
2. Create your website’s Duplicator Package.
To create a duplicator package of your site, from your admin dashboard, navigate to Dupliactor >> Packages. After that, at the top right corner of the page, click on the ‘Create New’ option.
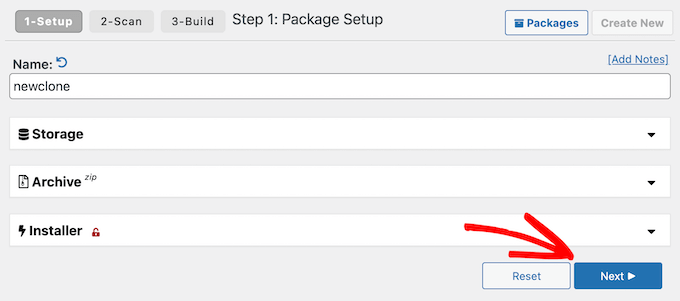
Now, on the next screen, enter a name for your duplicate file and then click on the ‘Next’ button.
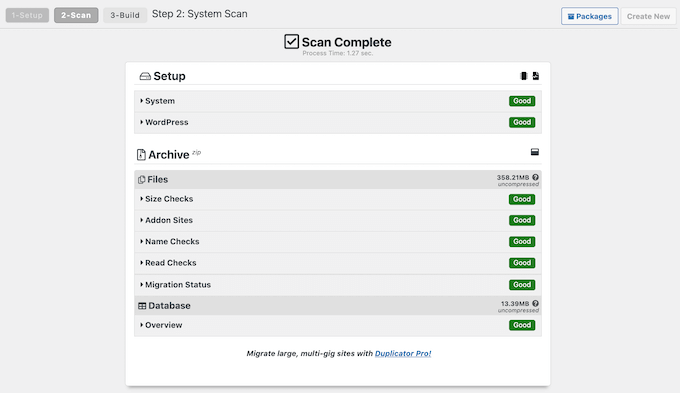
After that, the plugin will start scanning your WordPress website. If it discovers an issue on your site, in any part, it will give you a warning along with the details on how you can fix the issue.
Contrarily, if you see a message on your screen saying ‘Scan Complete,’ click on the ‘Build’ option on the left of your screen to continue.
Now, the plugin will back up all your website files, including the WordPress database, templates, images, plugins, and other files in a single file in a downloadable package. The process might take time, depending on the size of your website.
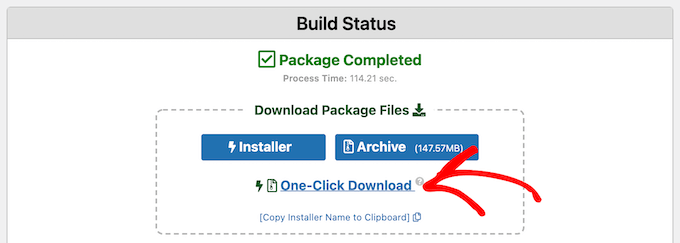
3. Get Ready to Clone Your WordPress Website
When your website’s backup is completed, you need to download your files. Note that you have to download two files, the archive file containing your backup and the installer file that will let you unpack the archive file.
For this, you are required to click on the ‘One-click Download’ link provided in the build status.
4. Save your Archive and Installer files to a new location.
Once you have a complete backup of your site, you need to upload it to a new location to save it.
You can either upload it to a local server or to a live website on a different web hosting provider. Here are both ways you can do it.
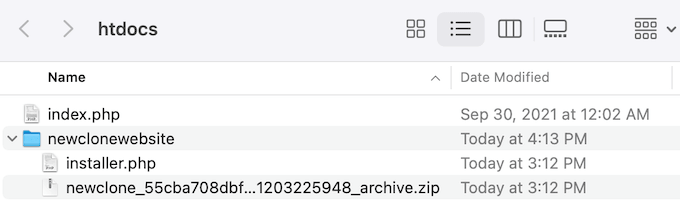
If the site is on a local server, you can create a new folder in the root folder of your local server. This is where your local server stores all your website files. For instance, if you use MAMP, then it will be the ‘/Applications/MAMP/htdocs/’ folder, or if you use WAMP, then it will be the ‘C:\wamp\www \’ folder.
After this, go ahead and open the folder you created for your cloned website. Once there, copy both the archive and installer into the new folder.
If you desire to upload it to a live website that is hosted on a different web hosting provider, you can use an FTP client to upload both the archive and installer files to the root directory.
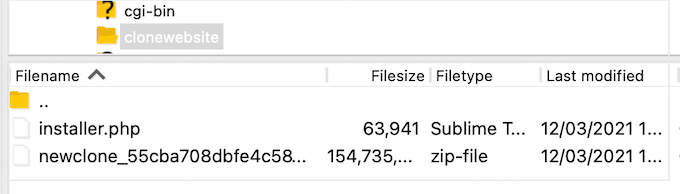
Regardless of where you upload your website files, ensure that the folder is new and only contains your archive zip files and installer.php files.
5. Create a new WordPress database.
Now, in order to unpack the cloned version of your WordPress website, you need to create a new WordPress database.
Depending on whether the new location of your website files is a local server or a live website, there are different ways you can use to create a new WordPress database.
-
Creating a database if you are using a live website
Log into the WordPress hosting dashboard and look for the ‘Database’ section. Once there, click on the ‘MySQL Database.’
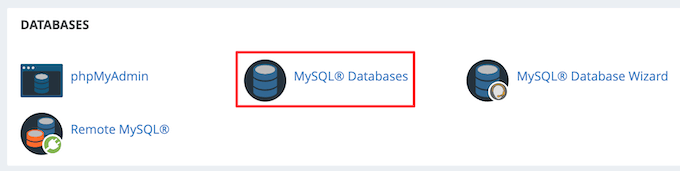
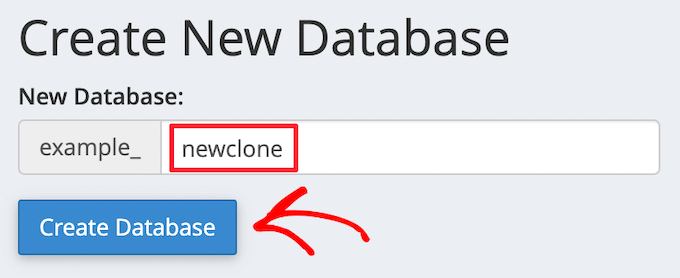
On the next screen, you need to enter a name for your database and click on the ‘Create Database’ button.
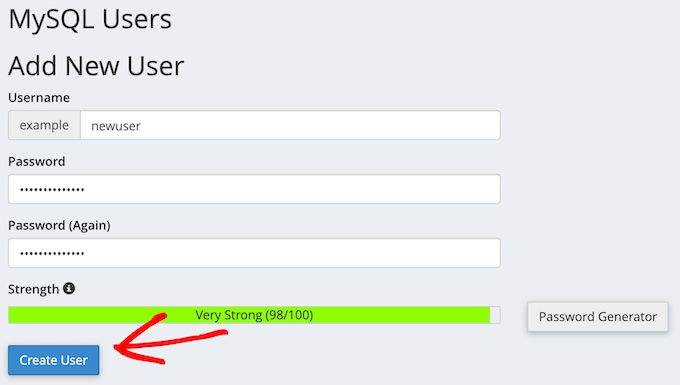
Then, you need to create a new user for the MySQL database. For this, scroll down to the ‘MySQL Users section and enter a new username and password. Once done, click on the ‘Create a User’ option.
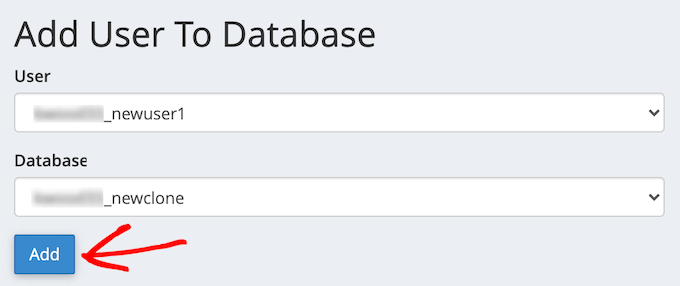
Once done, you need to add the new user to your database. For this, scroll down and look for the ‘Add User to a Database’ section. Once there, click on the ‘User’ and ‘Database’ dropdowns and select the user and database you created in the last step.
Ensure to remember or keep your database name, user name, and password in a separate place. Then, click on the ‘Add’ button.
-
Creating a database if you are using localhost
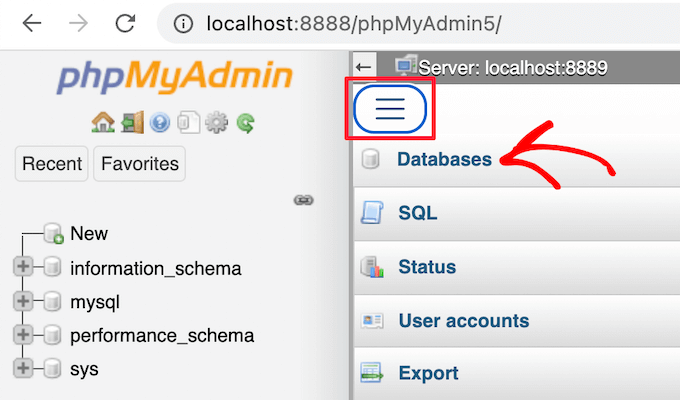
If you used a local host, use this method instead. To launch your phpMyAdmin, simply visit ‘http://localhost/phpmyadmin/ ‘or ‘http://localhost:8080/phpmyadmin/’ from your web browser.
Once done, select the ‘Menu’ tab and then the ‘Database’ option. This will take you to a screen where you need to type in a new name for the database.
Now, enter the new name and click the ‘Create’ button.

You’ll need this database name in the next step. For localhost installation, your host will be your localhost and your username will be root, and the password will be blank.
6. Run the Duplicator Importer Script
Once all your website files are in place, next, you need to run the Duplicator installer script. The script will help you unpack your website’s archive file in simple steps with just a few clicks.
For this, enter your website URL into your browser and add the ‘installer.php’ at the end of your URL. The URL might appear like this: ‘https://yoursite.com/installer.php.’ Don’t forget to replace yoursite.com with your site’s domain name or the local host address of your site.
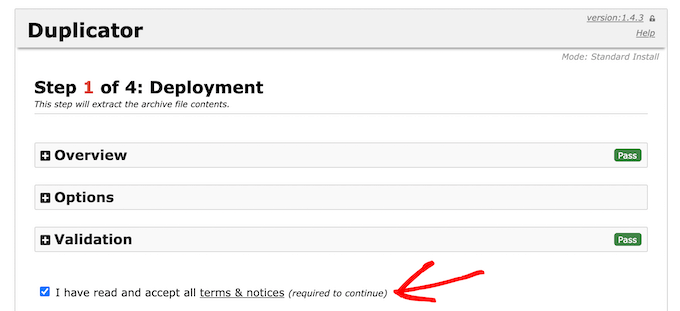
Now, you’ll witness the Duplicator installer script on your screen. The script will automatically look for the initial site settings and existing backup files of your site. If everything works fine, go ahead and check the box next to terms and notices at the bottom of your screen.
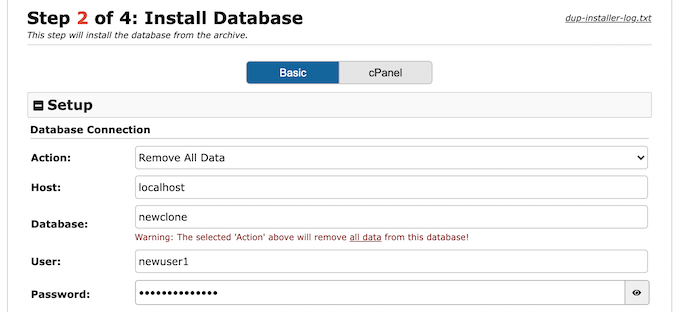
Once done, click on the ‘Next’ tab to continue. Then, on the next screen, you will be asked to enter your WordPress database details. These are the details we asked you to take note of above.
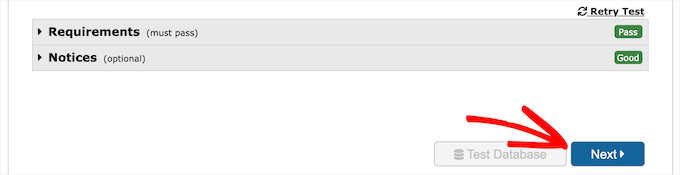
Once done, the plugin also allows you to check whether all your database information is correct. For this, you can use a ‘Test Database’ button. If everything works fine, click on the ‘Next’ button.
After this, the Duplicator will import all of your WordPress databases.
During the process, the plugin will automatically detect any changes and fill up the ‘URL,’ ‘Path,’ and ‘Title’ fields for you. Now, click the ‘Next’ tab to continue.
The plugin Duplicator will complete the installation, and you’ll witness an ‘Admin Login’ button on your screen. This will allow you to visit your new, cloned website.
7. Test your newly cloned website.
Once everything is set up successfully, you can now move ahead and test your cloned WordPress website. In order to make sure all your data is copied properly and everything is working as expected, we suggest you test both your WordPress admin area as well as your website’s front end.
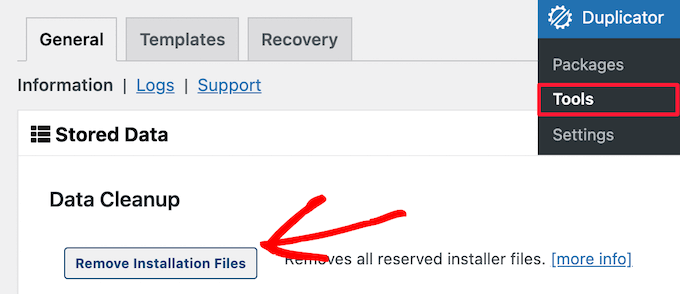
If you encounter any WordPress errors, you can troubleshoot them as quickly as possible. Else, if everything is good to go, you can proceed and delete the installation files that the Duplicator plugin created earlier.
For this, log in to your cloned WordPress website, navigate to the Duplicator>>Tools, and then click on the ‘Remove installation files’ option.
And that’s all. You have cloned your WordPress website successfully.
Final Thoughts!
If you’ve reached this point, you might have understood all the easy steps of cloning a WordPress website and discovered that duplicating a WordPress website is not as difficult as it appears. Knowing how to clone a WordPress Website opens up various opportunities for website admins and developers. Although you can manually clone a website, it can be time-consuming and might lead to errors. This method is easy to use and beginner-friendly. No matter why you want to clone a website, all the simple steps mentioned in this guide are easy to implement and will help you clone your website effortlessly.
We hope this detailed, step-by-step guide has assisted you in understanding the process thoroughly. If you find this helpful, you can also check out our easy guide on how to create a WordPress website in simple steps.
https://www.wpbeginner.com/wp-tutorials/how-to-clone-a-wordpress-site-in-7-easy-steps/